User Guide

- Introduction
- About
- Quick Start
- Commands
- FAQ
- Glossary
Introduction
Welcome to Nuudle’s User Guide! ![]()
Looking for a wonderful solution to simplify the complicated process of clinic management? Look no further!
Nuudle is a desktop application that helps nurses manage patient records and schedule appointments in an accurate and efficient manner. It provides features that allows you to easily manage and keep track of the upcoming appointments in your clinic.
Nuudle is simple and user-friendly. It is optimised for use via a Command Line Interface (CLI) while still providing you with the benefits of a Graphical User Interface (GUI). If you can type fast, Nuudle can manage your patients’ appointments faster than traditional clinic management applications.
Interested? Continue reading on to explore the wonders of Nuudle and enhance the way you schedule appointments for your patients.
About
This document provides you with all necessary information on the installation and complete usage of Nuudle. You can find comprehensive descriptions of all available features in our Commands section and Quick Start section will help you with setting up.
The guide also uses the following symbols and formatting:
- Words that looks like this can be clicked to navigate you to the related section of this user guide.
- Words that looks like this are words related to Nuudle’s GUI.
- Words that looks like
thisare words used in commands of Nuudle. - Words that looks like this are keys that you can press using your keyboard
![]() This icon is used to indicate additional useful notes and information.
This icon is used to indicate additional useful notes and information.
![]() This icon is used to indicate important information.
This icon is used to indicate important information.
Quick Start
This section provides a step-by-step guide on how to install Nuudle and get it to run on your computer. It also shows the different sections that make up Nuudle’s user interface and various sample commands.
Let’s get started! ![]()
Installing Nuudle
Follow these steps to get started:
- Ensure you have Java 11 or above installed on your Computer.
-
Proceed to Nuudle’s download page here.
-
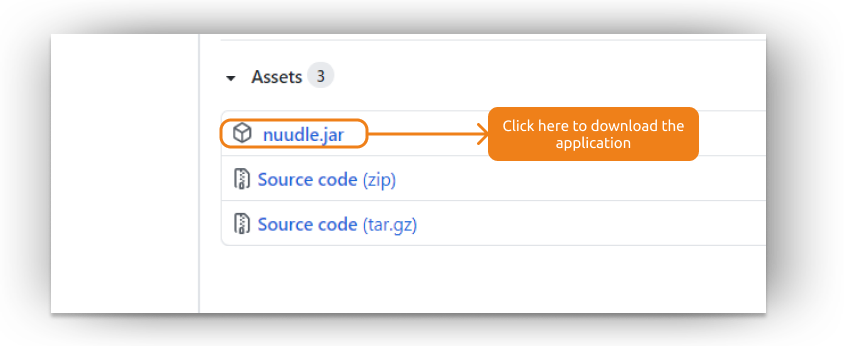
Click on the link displayed in the following picture to download Nuudle’s application file.
-
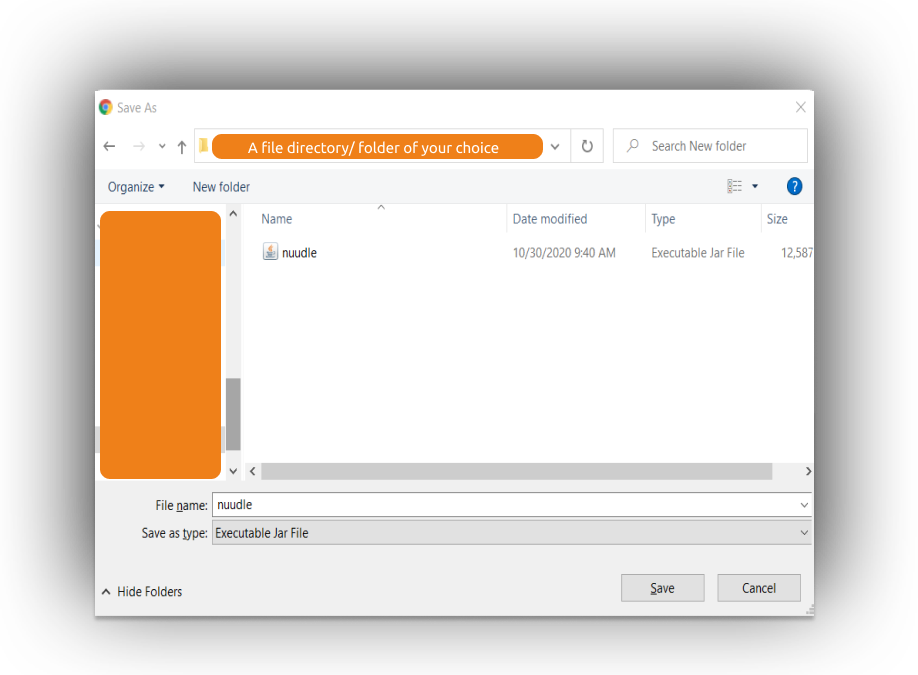
Save the file to a folder where you want to store the Nuddle application and it’s related data.
-
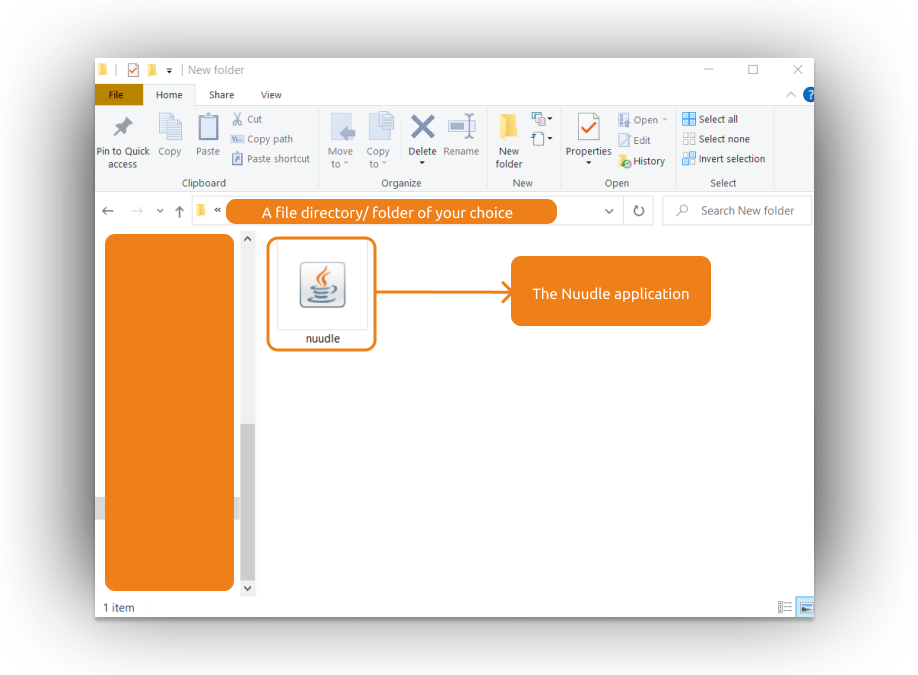
Double-click the
Nuudle applicationto start Nuudle up. An application window similar to the one below should appear in a few seconds.
- Notice how Nuudle comes with sample data to get you started.
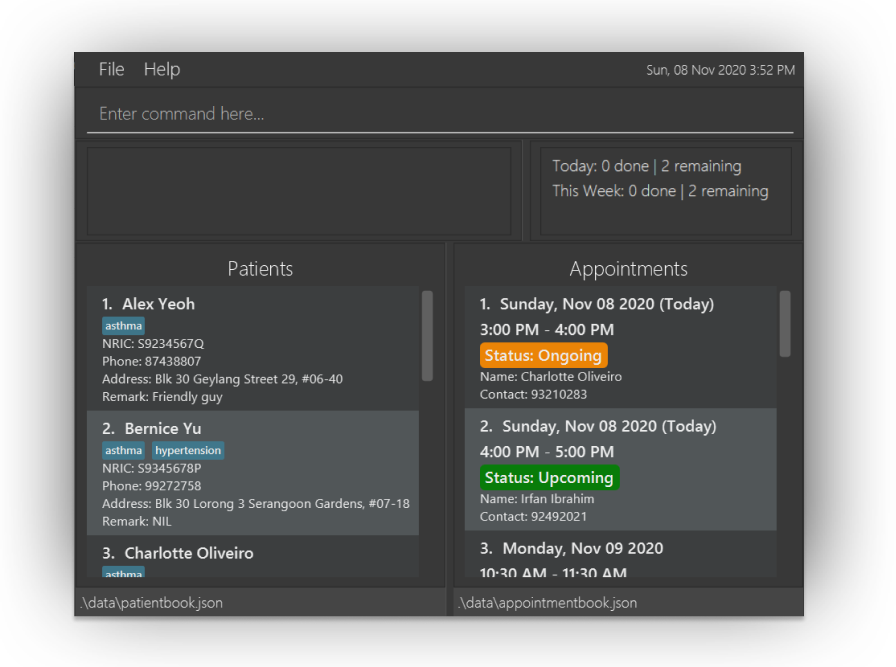
- Notice how Nuudle comes with sample data to get you started.
- Congratulations! Nuudle is now ready for your perusal

Using Nuudle
This section will walk you through the layout of Nuudle.
The layout of Nuudle can be divided into 2 main areas:
- The command execution area
- The main viewing area
Executing commands
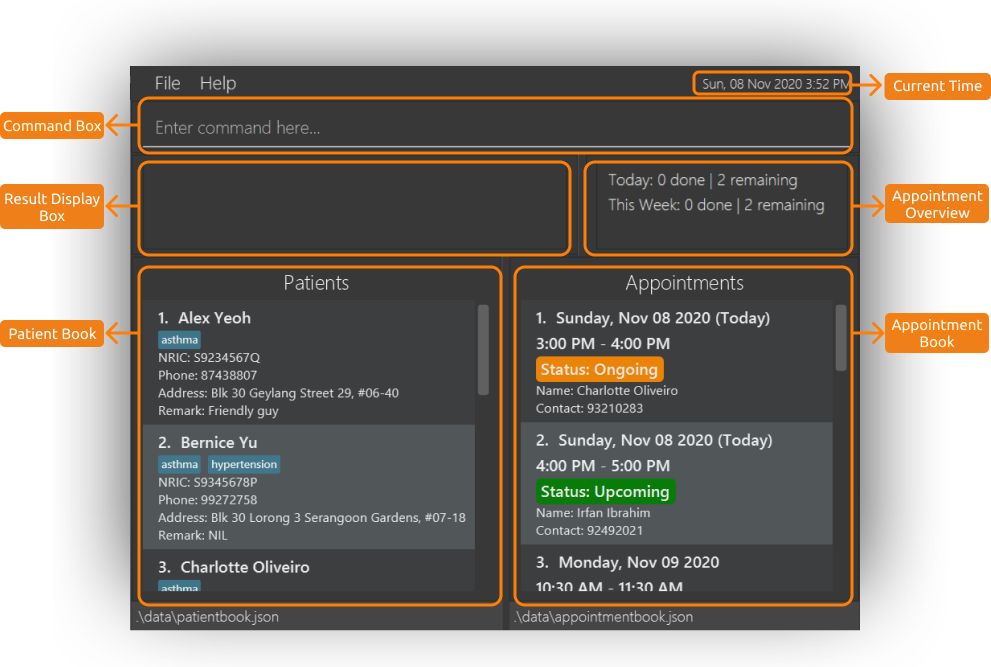
The command execution area consists of the Command Box and the Result Display Box.
The Command Box is the area where you can type in your command and subsequently execute it by pressing Enter. The result from the execution will then be displayed in the Result Display Box.
To get you started, here are some sample commands that you can try out:
-
help: Shows the help window. -
list: Lists all patients.
-
addn/John Doe i/S9730284G p/98765432 a/John street, block 123, #01-01: Adds a patient namedJohn Doeto the patient book. -
assign1 d/Tomorrow t/8.30am dur/30: Creates an appointment for the 1st patient in the patient list for tomorrow 8.30am to 9am, assuming that the time slot is free. -
viewd/Tomorrow: Displays all appointment happening tomorrow. -
cancel1: Cancels the first appointment in the displayed appointment list. -
clear: Deletes all patients and appointments. -
exit: Exits the app.
To learn more about the various commands used in Nuudle, head down to our Commands section.
Alternatively, you can visit our Command Summary section to get a quick overview of Nuudle’s commands.
Viewing data
The main viewing area consists of the Patient Book, the Appointment Book and the Appointment Overview.
-
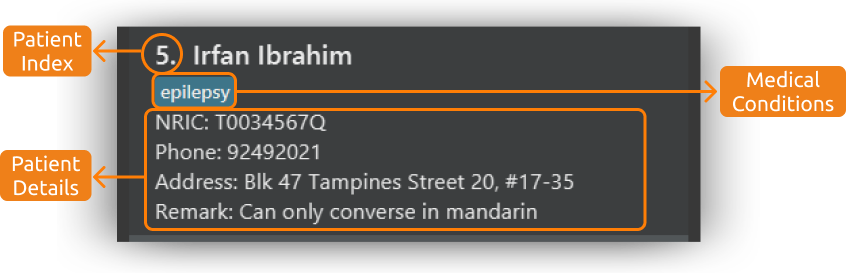
The Patient Book contains information about the patients stored in Nuudle. Here we take a look at an entry in the Patient Book.
-
The Patient Index is a numbering system used in the Patient Book, which allows you to easily reference the patient by using the index shown. Throughout the document and the application, we use the term
PATIENT_INDEXto refer to this numbering. -
The Medical Condition here is a tag that help nurses easily identify any identified allergy, illness and more. This medical condition can be added as a tag when adding a new patient or by editing an existing patient.
-
The Patient Details are neatly displayed at the bottom for you to easily check and identify a patient.
-
-
The Appointment Book contains details about the appointments created by Nuudle. Here we take a look at a single entry in the Appointment Book

-
Similar to the Patient Index, the Appointment Index is a numbering system used in the Appointment Book. We use the term
APPT_INDEXto refer to this numbering. -
Another important part of an appointment is the Appointment Status. There are four status types used in Nuudle and the meaning of each status is shown in the table below:
Appointment Status Meaning 
A completed appointment that has been marked as done using the donecommand
An uncompleted appointment that will be happening in the future. 
An appointment that is currently ongoing but is still uncompleted. 
An appointment that has already passed but is still uncompleted. - The Patient Details in the appointment entry provides the basic information of the patient, namely the name and the contact number. This allows you to easily keep track of who will be coming for the appointment and also call up the patient, if necessary.
-
-
Lastly, the Appointment Overview provides simple statistics about the appointments stored in Nuudle.

With it, you can:
- keep track of the total number of expected appointments for the day.
- stay updated on the remaining number of appointments to be completed for the day.
- get an estimate on how busy the clinic will be for the rest of the week.
Commands
The command is the main way to schedule appointment for a patient with Nuudle.
This section introduces three types of commands:
An overview of all the commands is also provided in the Command Summary.
Command format
This section emphasises on the common format across all command input.
![]() Notes about the command format:
Notes about the command format:
-
Words in
UPPER_CASEare the parameters to be supplied by the user.
e.g. inadd n/NAME,NAMEis a parameter which can be used asadd n/John Doe. -
Items in square brackets are optional.
e.gn/NAME [t/TAG]can be used asn/John Doe t/hypertensionor asn/John Doe.
-
Items with
… after them can be used multiple times including zero times.
e.g.[t/TAG]…can be used as ` ` (i.e. 0 times),t/friend,t/friend t/familyetc. -
Parameters can be in any order.
e.g. if the command specifiesn/NAME p/PHONE_NUMBER,p/PHONE_NUMBER n/NAMEis also acceptable. -
Indexes must be a positive integer: 1, 2, 3, …
-
Date and time can be written using various commonly used formats or even using natural language. A summary of the supported formats and languages is shown in the table below:
| Formatted Date | Natural Date | Formatted Time | Natural Time |
|---|---|---|---|
| 02/12/2020 | Today | 2300 | Morning (8AM) |
| 02-12-2020 | Tomorrow | 11:00PM | Noon (12PM) |
| 12/02/2020 | Monday | 11.00PM | Evening (7PM) |
| 12-02-2020 | Tuesday | 11PM | Night (10PM) |
| 2020/12/02 | Wednesday | ||
| 2020-12-02 | Thursday | ||
| 2-Dec-2020 | Friday | ||
| 2 Dec 2020 | Saturday | ||
| 2-December-2020 | Sunday | ||
| 2 December 2020 |
- For all date formats, the year can be omitted if it is the same as the current year.
![]() Important information about the command parameters
Important information about the command parameters
-
DATE- Please use the prefix
d/when indicating aDATEvalue in your user input. - Please note that the
DATEused for scheduling an appointment must be set in the future. - Please refer to the following link for the different
DATEformats we support in our Nuudle application.
- Please use the prefix
-
TIME- Please use the prefix
t/when indicating aTIMEvalue in your user input. - Please note that the
TIMEused for scheduling an appointment must be set in the future. - Please refer to the following link for the different
TIMEformats we support in our Nuudle application.
- Please use the prefix
-
APPT_INDEX&PATIENT_INDEX- Unlike
DATEandTIME, we do not require users to enter a prefix before theINDEXvalue. - Please note that the index used must be a positive integer. For example, valid index values include 1, 2, 3, etc …
- The
APPT_INDEXrefers to the number shown in the displayed appointment book located on the right side of the UI.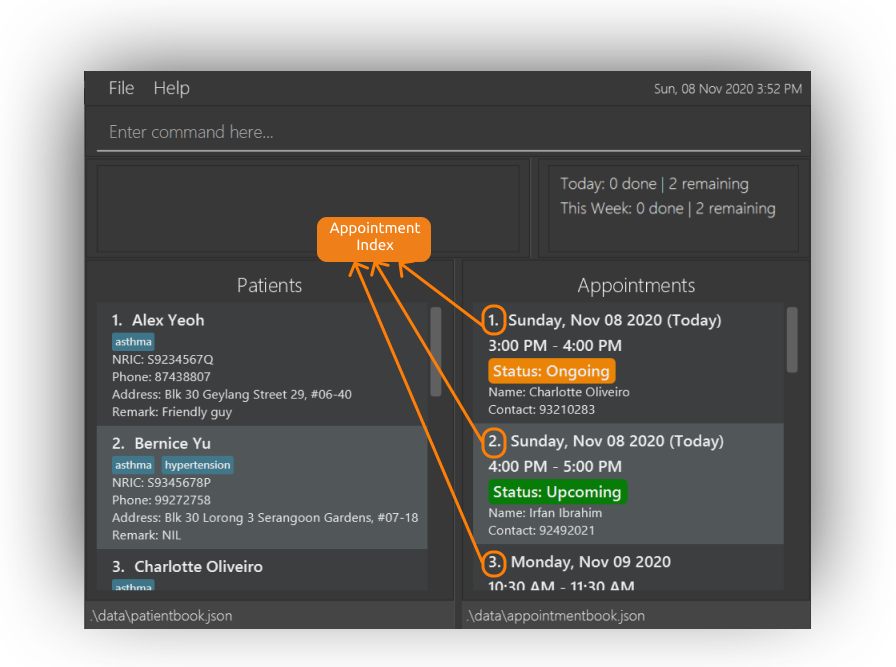
- The
PATIENT_INDEXrefers to the number shown in the displayed patient book located on the left side of the UI.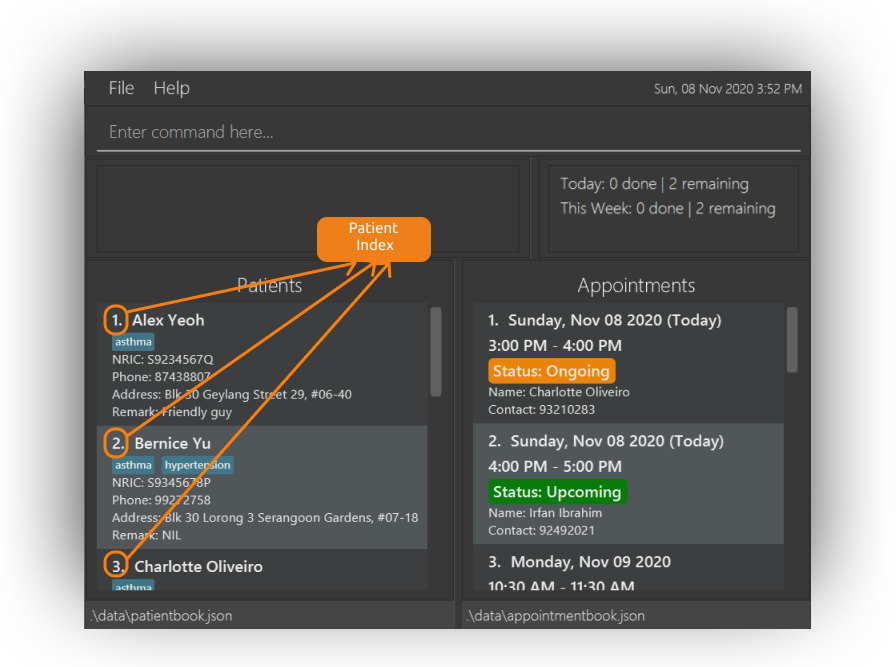
- Unlike
-
DURATION- We measure our
DURATIONinputs in minutes. For example, to enter aDURATIONof 1 hour, kindly usedur/60as the input value. - The
DURATIONof an appointment must be a positive integer that is greater than or equal to 10 minutes. - To provide you with a better user experience, we decided to display the time range of an appointment calculated by adding the
DURATIONyou entered to the startingTIMEof the appointment.

- We measure our
General
Viewing help : help
Opens a new window which shows the commonly used commands, and a link to access the User Guide.
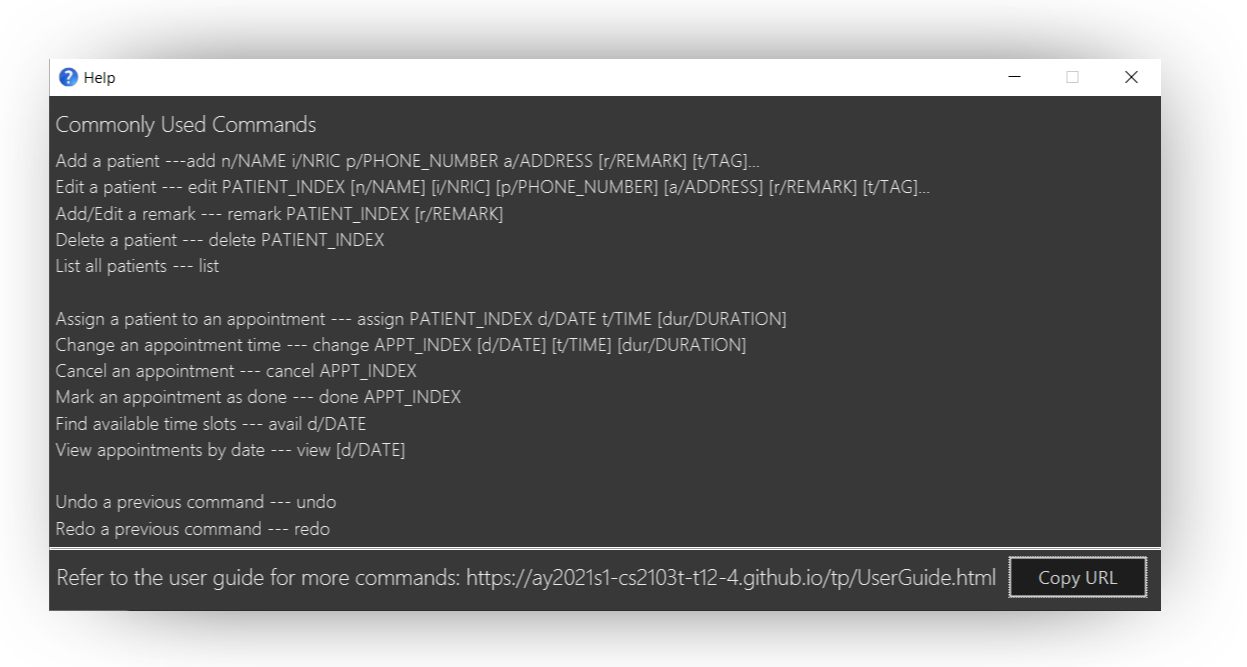
Format: help
Undoing previous command : undo
Restores the patient and appointment book to the state before the previous undoable command was executed.
undo command cannot reverse a command execution from the previous Nuudle session.
Format: undo
- There must be at least one previously executed undoable command.
- Multiple calls to
undowill reverse multiple undoable command execution, starting from the most recent command.
Examples:
-
delete 1
list
undo(reverses thedelete 1command) -
view d/today
list
undo
Theundocommand fails as there is no previous undoable command to reverse. -
cancel 1
clear
undo(reverses theclearcommand)
undo(reverses thecancel 1command)
Step-by-step illustration:
-
Initial state:
-
Input
delete 1:
The first patientAlex Yeohis deleted. -
Input
undo:
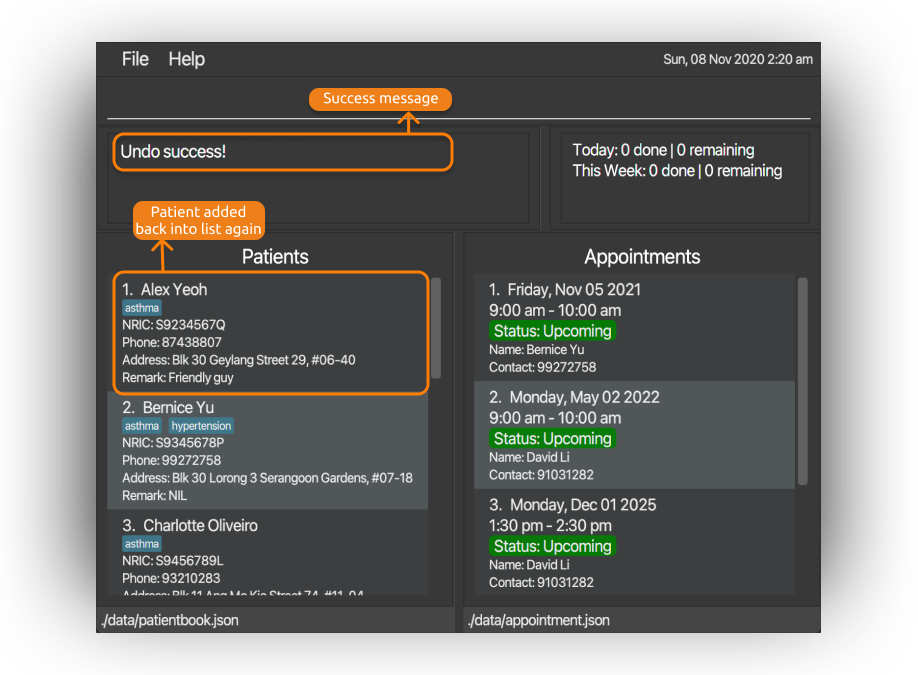
Theundocommand cancels the last undoable commanddelete 1, so that the patientAlex Yeohcomes back to the list again.
Redoing the previously undone command : redo
Reverses the most recent undo command. redo command cannot reverse an undo execution from the previous Nuudle session.
Format: redo
- There must be at least one previously executed
undocommand. - The previously executed
undocommand should be the most recent command that modifies the lists’ data. - Multiple call to
redowill reverse multipleundocommand, starting from the most recentundocommand.
Examples:
-
cancel 1
undo(reverses thecancel 1command)
list
redo(reapplies thecancel 1command) -
cancel 1
undo(reverses thecancel 1command)
cancel 2
redo
Theredocommand fails as there are noundocommands executed previously. -
cancel 1
clear
undo(reverses theclearcommand)
undo(reverses thecancel 1command)
redo(reapplies thecancel 1command)
redo(reapplies theclearcommand)
Step-by-step illustration:
-
Initial state:
-
Input
clear:

-
Input
Undo:
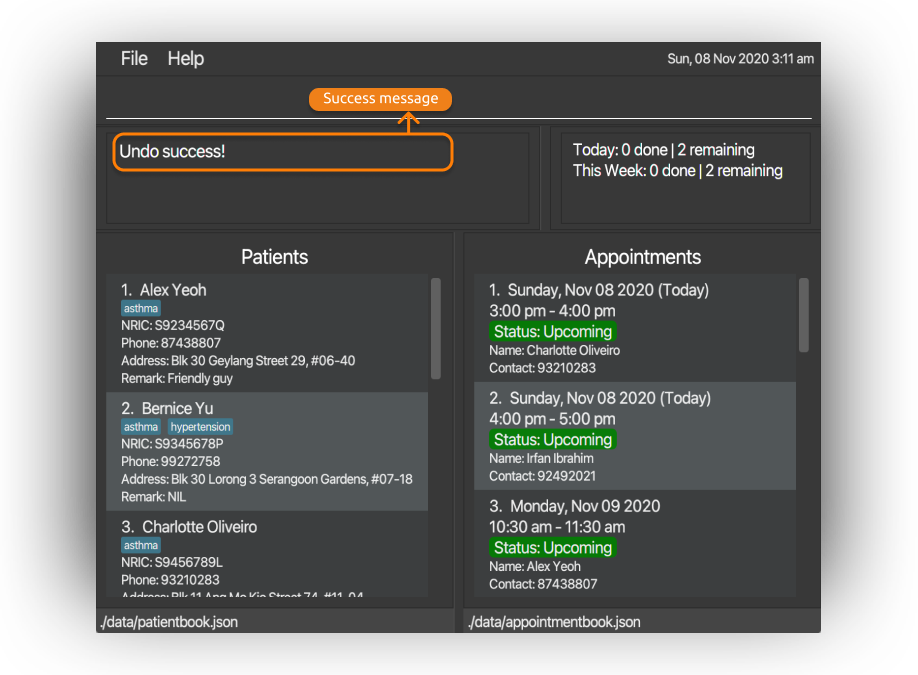
All the data comes back. -
Input
Redo:
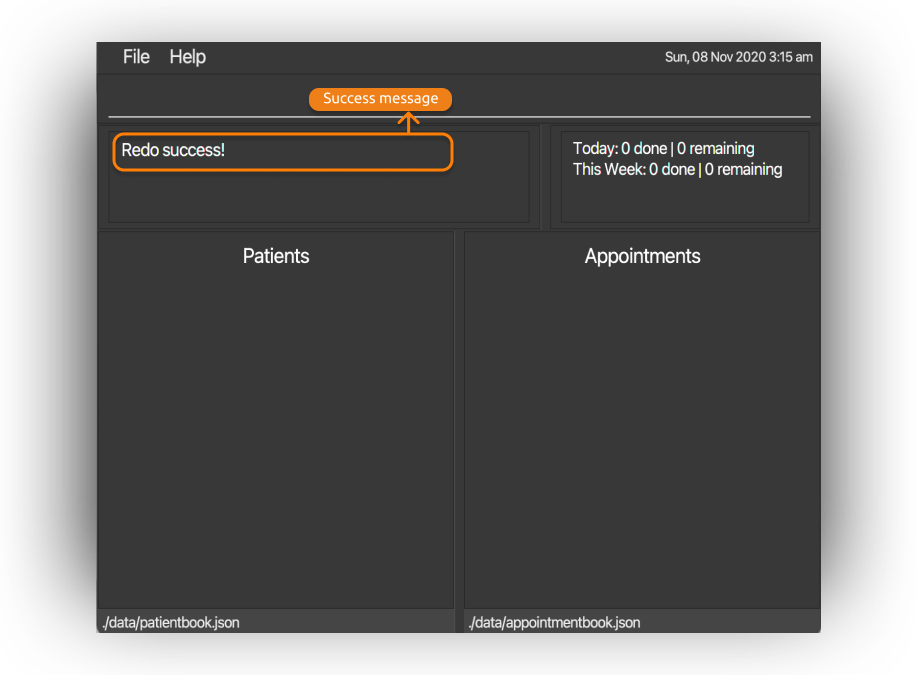
Redo theclearcommand, which removes all the data again.
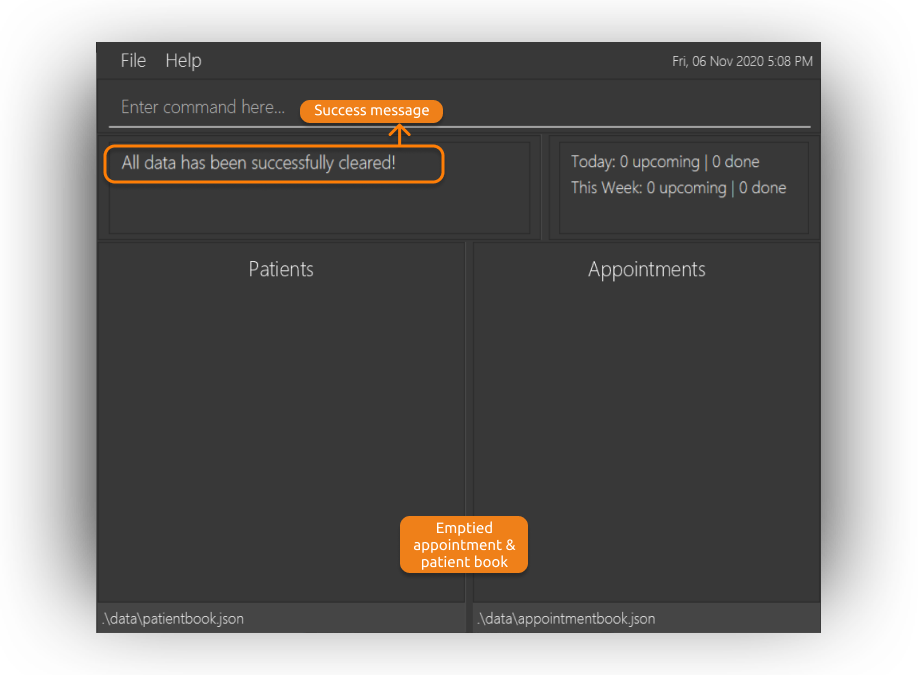
Clearing all data : clear
Clears all appointment and patients entries.
Format: clear
Step-by-step illustration:
-
Suppose you would like to clear the sample data to officially start using Nuudle from scratch, you can simply type in the command
clearand press Enter.
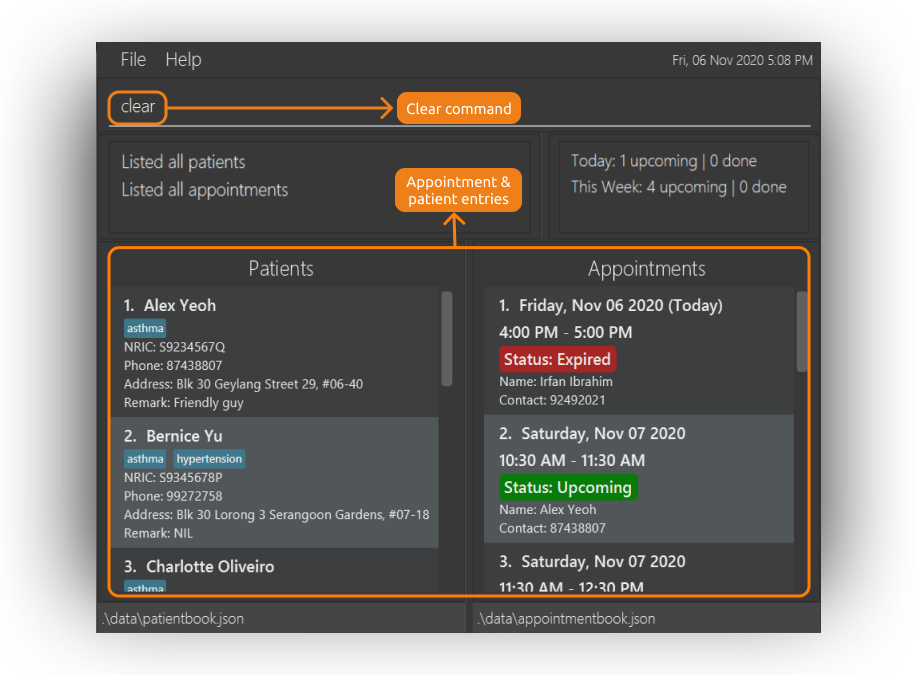
-
All patient and appointment entries are cleared. You can now officially start adding your clinic’s patient and appointment entries.
Exiting the program : exit
Exits Nuudle.
Format: exit
Retrieving previously entered commands
By pressing the ↑ and ↓ arrow keys in the command box, you can cycle through the previously executed commands.
undo to correct a wrongly executed command.The steps below illustrate how this correction can be done:
1. Use the
undo command to first reverse the previous command execution.2. Next, use the ↑ arrow key in the command box to retrieve the original command.
3. You can then edit the original command and execute it by pressing the Enter key.
With this feature, it saves you the hassle of having to retype the whole command again!
Saving the data
Nuudle automatically saves the patient and appointment data to your home folder after any changes are made to the data. There is no need for you to save manually.
Archiving past appointments
Nuudle automatically removes past appointments and saves them into an archive folder for your future reference. This is done automatically everytime you start up the Nuudle app.
The appointments are grouped by their appointment months and saved in respective Comma-Separated Values (CSV) files. These files can be opened and viewed using Excel.
Backing up the data
Nuudle also keeps a backup of your data files from the previous Nuudle session in a backup folder. The backup data will be updated everytime you start up the Nuudle app.
This backup allows you to completely revert your data to the previous session’s data. This is especially useful if your data was unintentionally corrupted and you need to manually restore the data.
Patient Management
Adding a patient : add
Adds a patient to the patient book.
Format: add n/NAME i/NRIC p/PHONE_NUMBER a/ADDRESS [r/REMARK] [t/TAG]…
- Adds a patient with the specified details.
- The following fields are compulsory and must be provided:
NAME, NRIC, PHONE_NUMBER, ADDRESS. - It is optional to add
TAGs for the patient. Tags can still be added with the edit command upon creating the patient entry in Nuudle.
Examples:
add n/John Doe i/S9730284G p/98765432 a/John street, block 123, #01-01add n/Betsy Crowe i/S9123456G t/friend a/NUS Utown p/1234567 t/asthma
Step-by-step illustration:
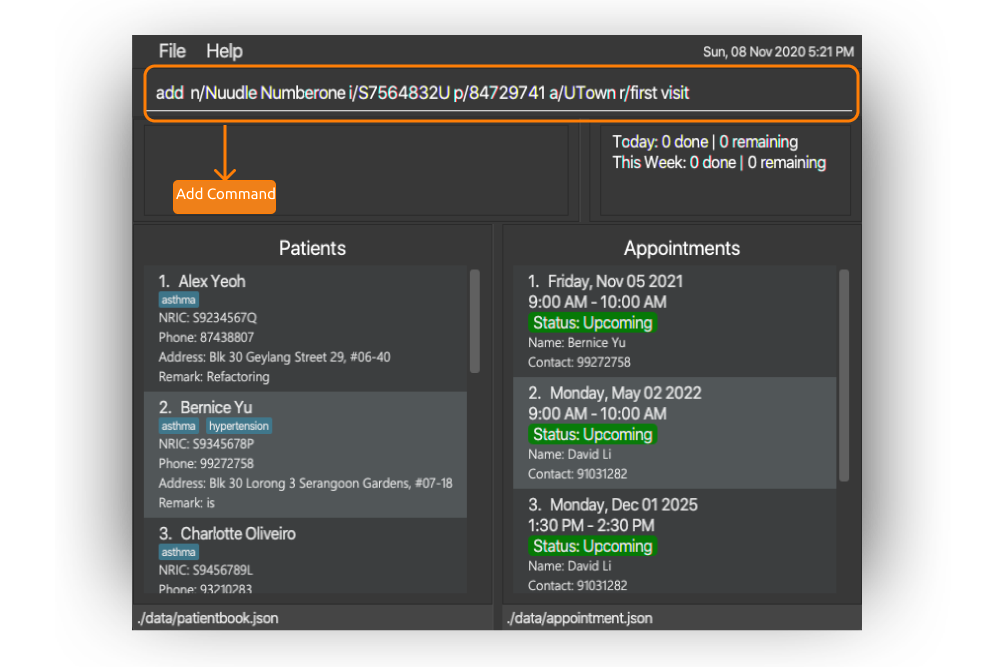
-
Enter
add n/Nuudle Numberone i/S7564832U p/84729741 a/UTown r/first visitin the command box.
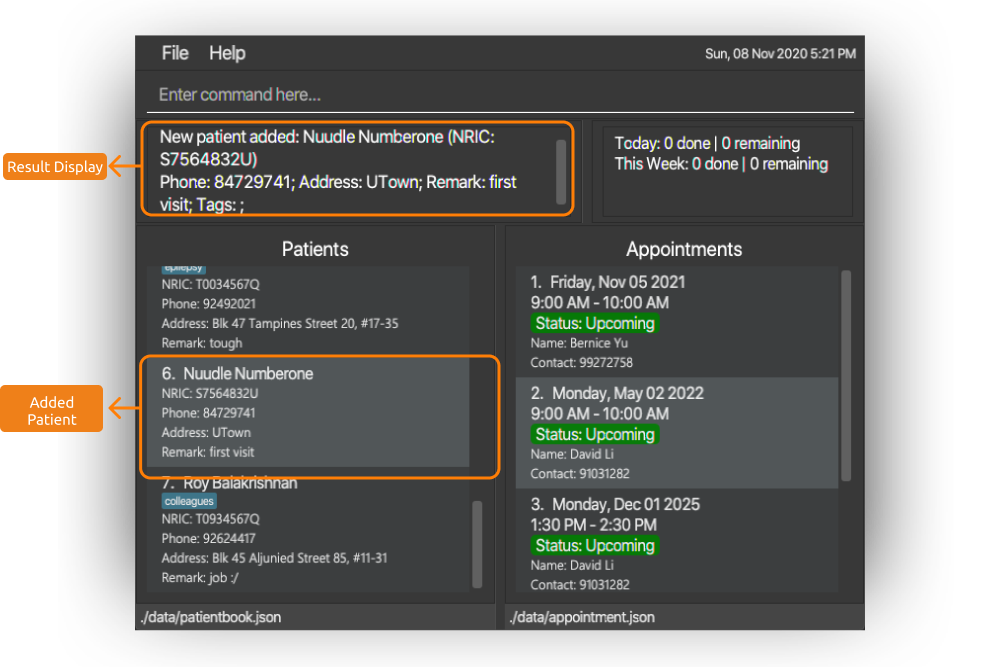
-
The information of the added patient is displayed in the result display box. The patient is now added to the patient book.
Editing a patient : edit
Edits a patient’s particulars. Existing appointments involving the edited patient will be updated accordingly.
Format: edit PATIENT_INDEX [n/NAME] [i/NRIC] [p/PHONE_NUMBER] [a/ADDRESS] [r/REMARK] [t/TAG]…
- Edits the patient at the specified
PATIENT_INDEX. - At least one of the optional fields must be provided to execute the
editcommand. - The patient’s existing particulars will be updated according to the input values.
- When editing tags, the existing tags of the patient will be removed i.e adding of tags is not cumulative.
- You can remove all the patients’ tags by typing
t/without specifying any tags after it.
Examples:
-
edit 1 p/91234567 a/College Avenue 8Edits the phone number and email address of the 1st patient to be91234567andCollege Avenue 8respectively. -
edit 2 n/Betsy Crower t/Edits the name of the 2nd patient to beBetsy Crowerand deletes all existing tags.
Step-by-step illustration:
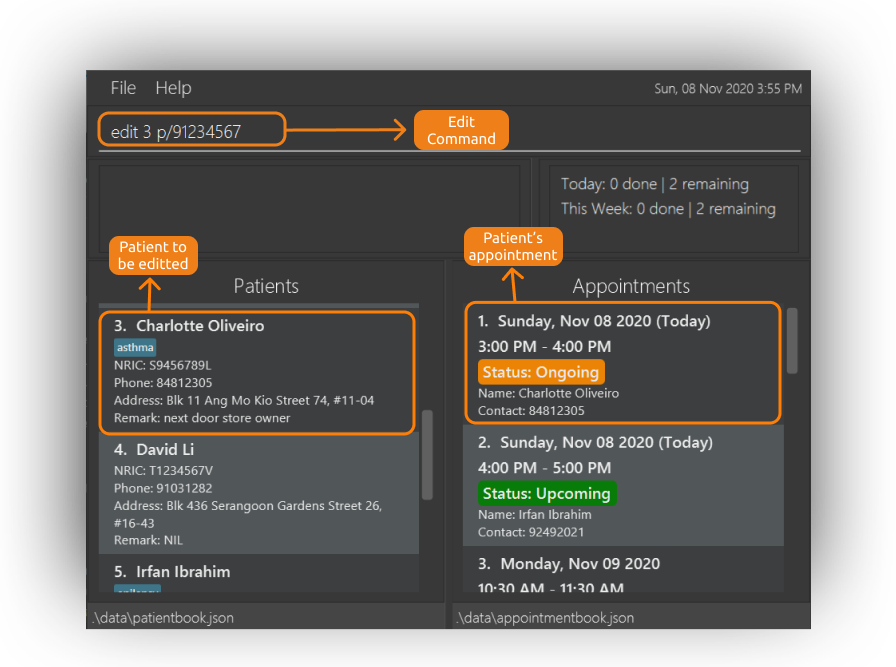
-
Suppose a patient, Charlotte, changes her phone number from
84812305to91234567, simply typeedit 3 p/91234567in the command box and press Enter.
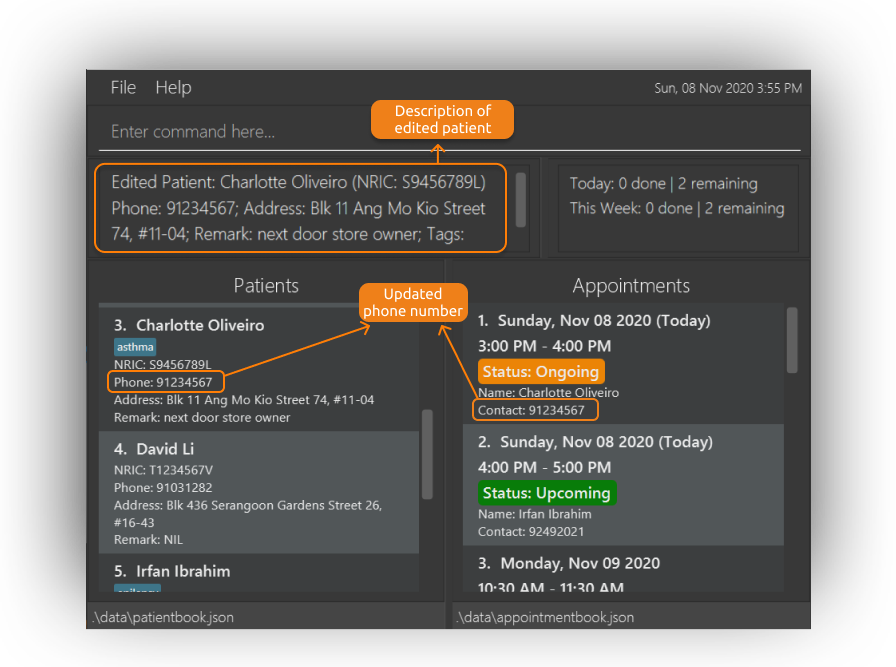
-
Charlotte’s phone number is now updated and the change is also reflected in the relevant appointments. The particulars of the edited patient is displayed in the result display box.
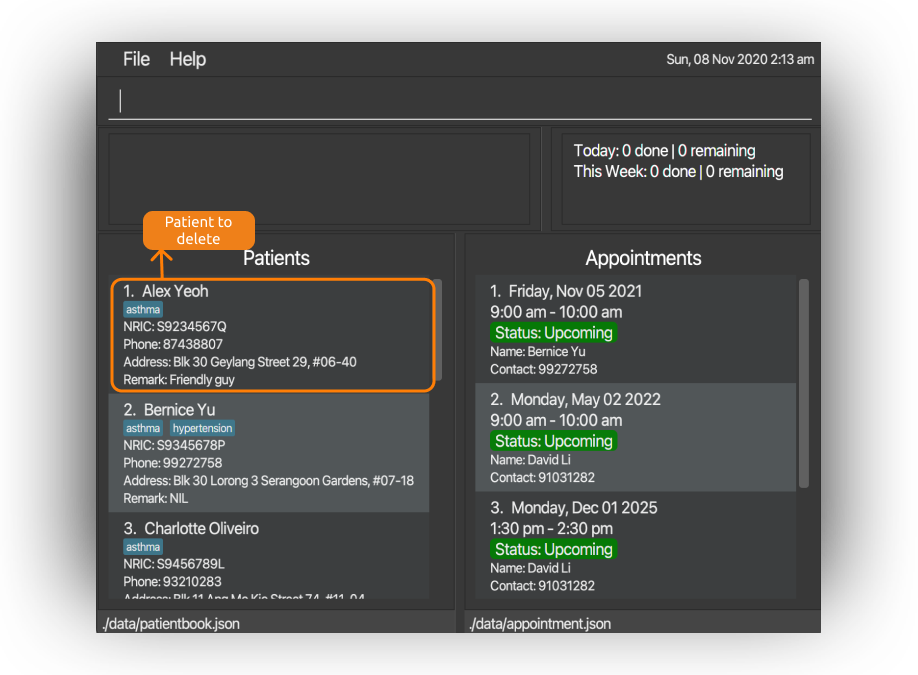
Deleting a patient : delete
Deletes a patient from the patient book.
Format: delete PATIENT_INDEX
- Deletes the patient at the specified
PATIENT_INDEX. - Please click here for important formatting information regarding the
PATIENT_INDEXfield. - Do note that deleting a patient will also delete all corresponding appointments belonging to that patient.
Examples:
-
delete 2
Deletes the 2nd patient displayed in the patient book. - Calling
find Betsyfollowed bydelete 1deletes the 1st patient displayed in the resulting patient book of thefindcommand.
Step by step illustration:
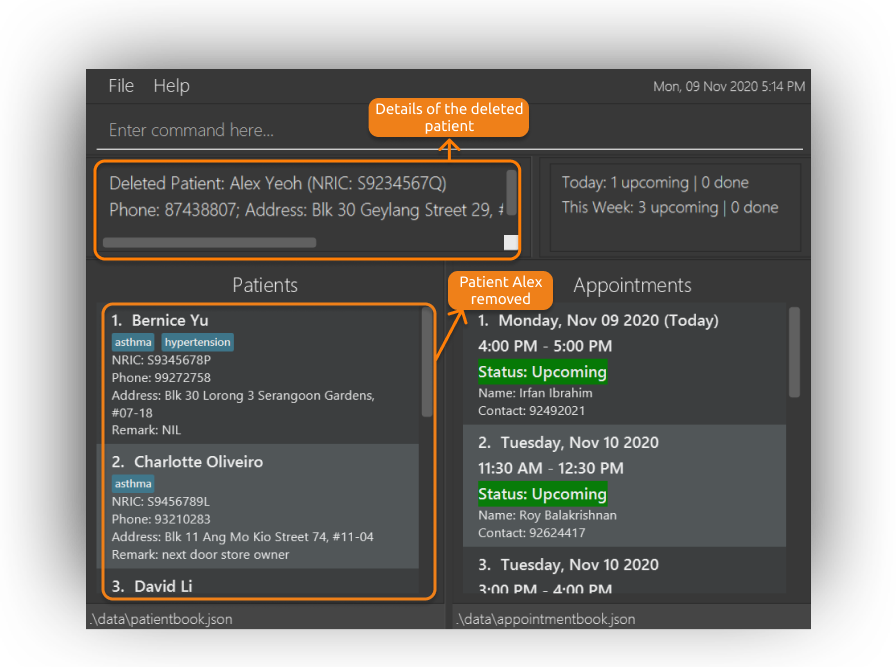
-
Suppose you want to delete Alex, which is currently at the top of the patient book, from your database.
Simply enterdelete 1in the command box and press Enter.

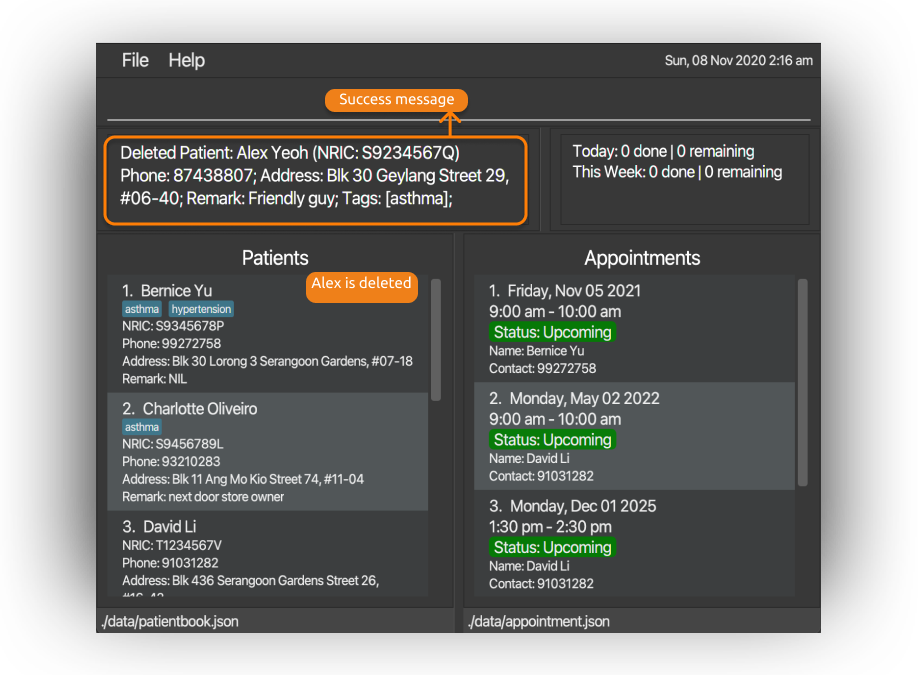
-
Alex is now deleted from the database and the patient book is updated accordingly.
Adding a remark to a patient: remark
Looking to add additional data unique to your patient besides the basic fields? Look no further. Use this command to add or delete a remark to an existing patient.
Format: remark PATIENT_INDEX [r/REMARK]
Alternatively, you can use the edit command to add or edit remarks if you wish to change multiple fields (eg. Phone number) at the same time.
-
Adds a remark for the patient at the specified
PATIENT_INDEX. - Please click here for important formatting information for the
PATIENT_INDEXfield. - A remark is an optional field and can be left blank if you wish to delete the existing
REMARK. - A patient will have
NILdisplayed as his/her remark status if it was left empty. - To override a remark, simply use the remark command as described above.
- If you wish to delete a patient’s remark, simply use either of the following commands:
remark PATIENT_INDEXremark PATIENT_INDEX r/
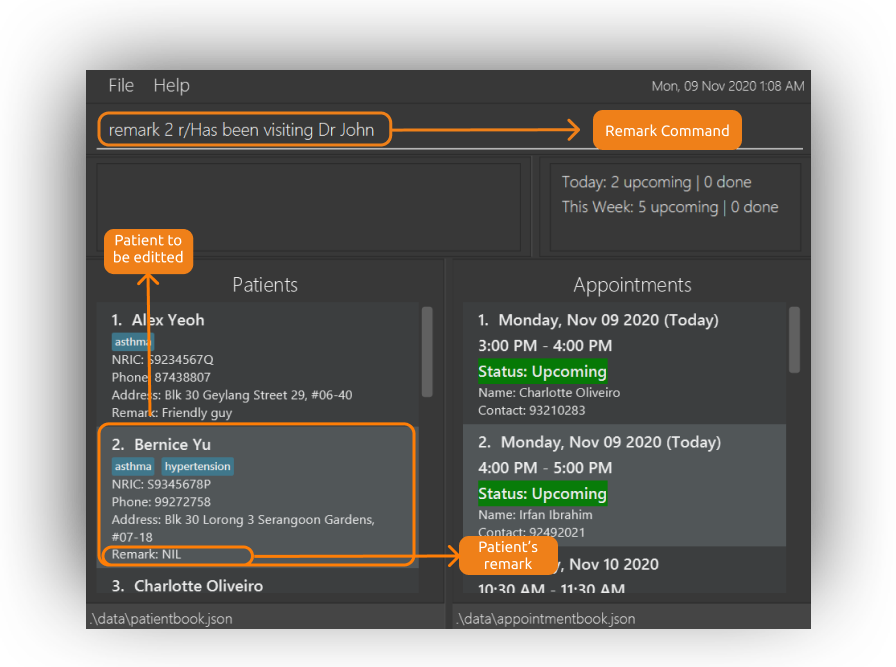
Examples to add remark:
-
remark 2 r/Has been visiting Dr John
Adds a remarkHas been visiting Dr Johnto the patient currently displayed second from the top in the patient list. -
remark 1 r/Can only converse in mandarin
Adds a remarkCan only converse in mandarinto the patient currently displayed at the top of the patient list.
Step by step illustration for adding a remark:
- Suppose you want to add additional information for your regular patient, Bernice, by indicating her preferred dentist.
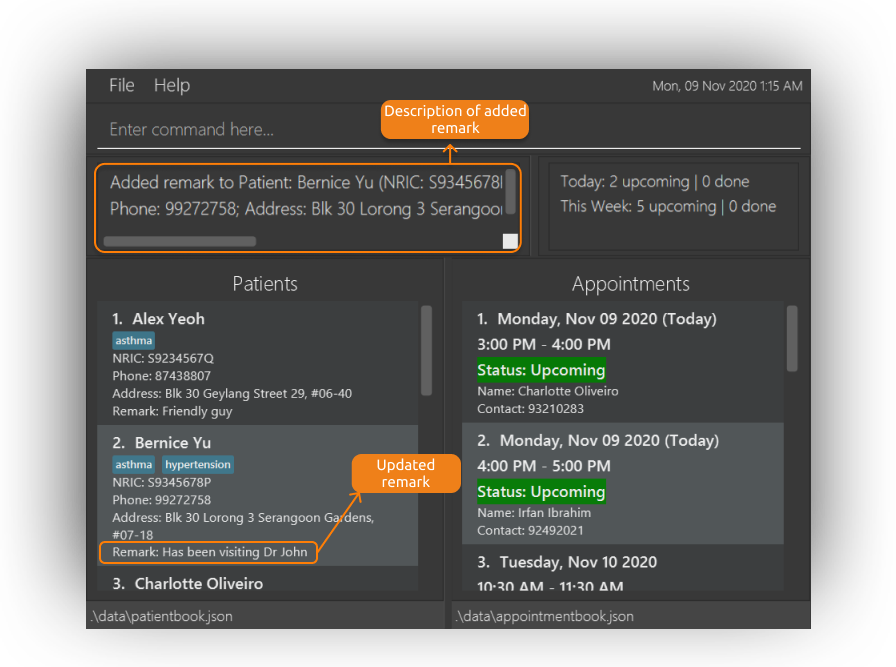
Simply enterremark 2 r/Has been visiting Dr Johnin the command box and press Enter.
- Bernice’s remark is now updated and the particulars of the added remark is displayed in the result display box.
Examples to delete the remark for a patient at index 1:
remark 1 r/remark 1
Step by step illustration for deleting a remark:
- Suppose you want to delete the remark data for Bernice, simply enter
remark 2in the command box and press Enter.
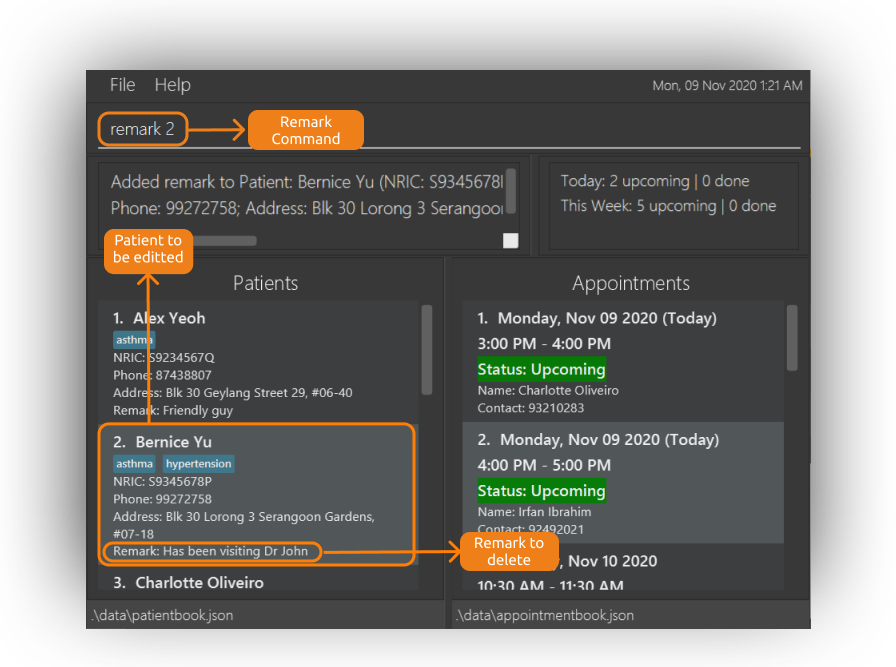
- Bernice’s remark is now deleted and the particulars of the deleted remark is displayed in the result display box.

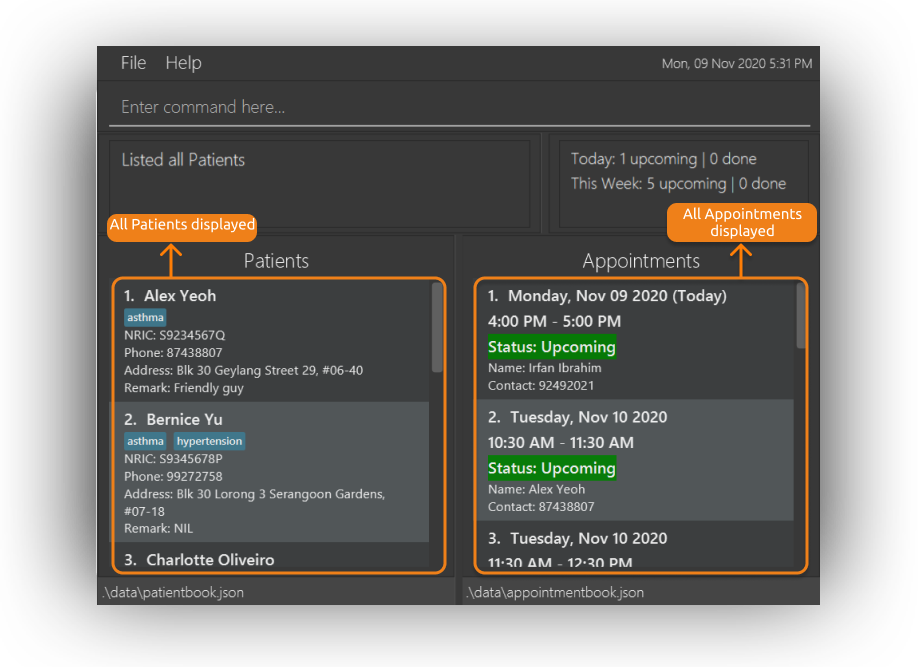
Listing all patients : list
If you like to reset the displayed patient or appointment book to it’s original state after using a command like find or view, use this command to display the full list of all patients and appointments in NUUDLE.
Format: list
Step by step illustration:
-
Suppose you used the
findcommand previously to locate appointments that belonged to a patient, Alex, and now wish to reset the displayed lists to their original states, simply typelistin the command box and press Enter.
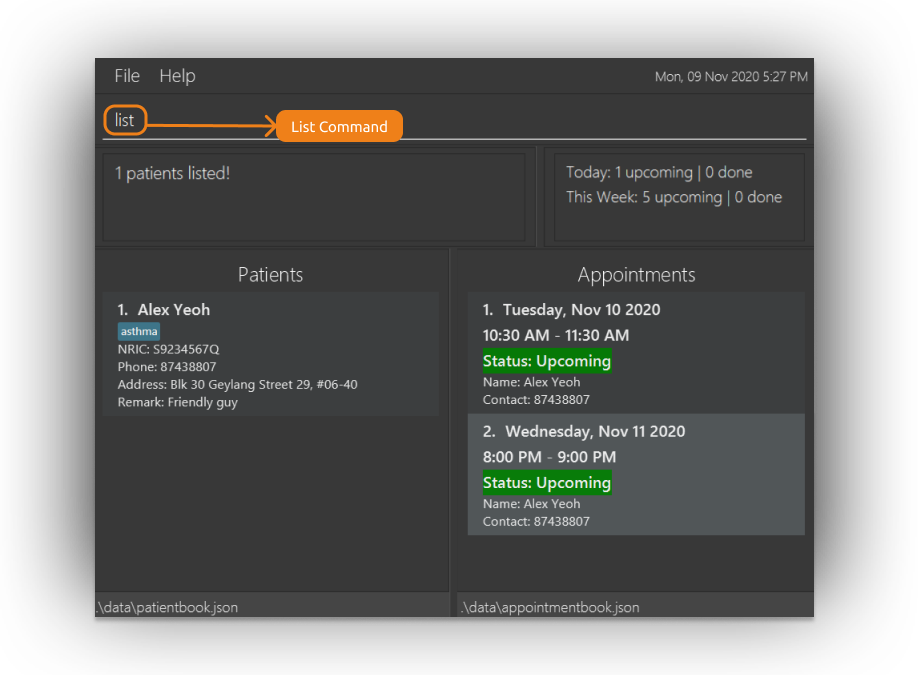
-
Both the appointment and patient books are updated to display all patient and appointment data.
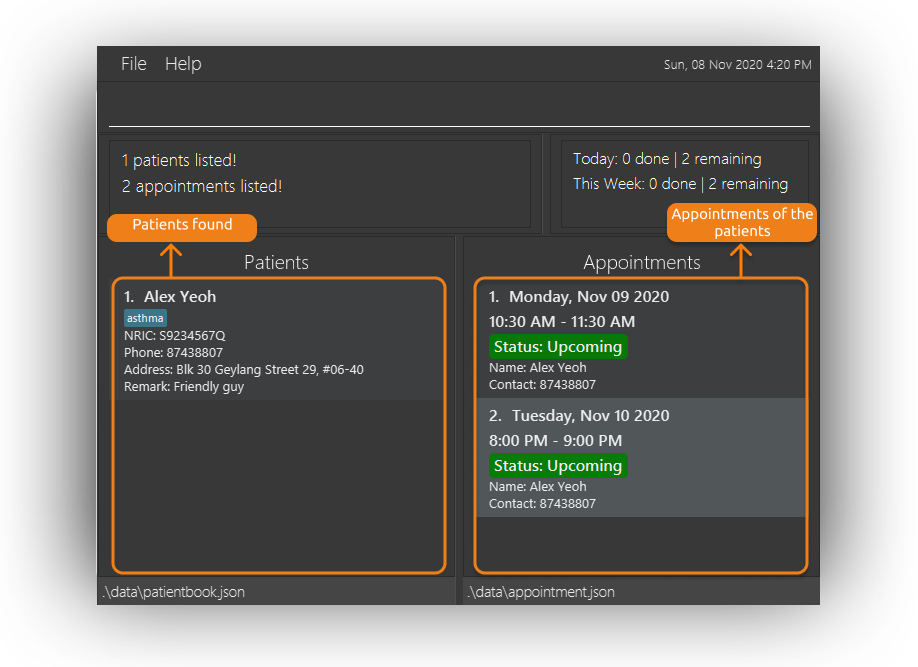
Locating patients by name : find
Finds patients by name, NRIC or phone numbers.
Format: find [n/NAME [MORE_NAMES]] [i/NRIC [MORE_NRICS]] [p/PHONE_NUMBER [MORE_PHONE_NUMBERS]]
- The search is case-insensitive. e.g
hanswill matchHans - The order of the keywords does not matter. e.g.
Hans Bowill matchBo Hans - Only the name, NRIC, and phone number are searched.
- Only full words will be matched e.g.
Hanwill not matchHans - Patients matching at least one keyword will be returned (i.e.
ORsearch). e.g.Hans Bowill returnHans Gruber,Bo Yang - The respective appointments of patients matching at least one keyword will also be returned.
- The search requirements cannot be left empty, at least one search requirement (by name, NRIC, or phone number) has to be provided
Examples:
-
find n/Johnreturns patients whose name containsjohn. -
find n/alex p/99998888 i/S1234567Ireturns patients whose name containsAlex, or whose phone number is99998888, or whose NRIC number isS1234567I.
Step by step illustration:
Suppose you want to find a patient named as alex or with a phone number of 99998888, or with NRIC number of S1234567I, you can:
-
Enter
find n/alex p/99998888 i/S1234567I.

-
The number of patients found and the number of appointments of these patients are displayed in the result display box, and the corresponding patient and appointment details are displayed in the patient and appointment book respectively.
Appointment Management
Adding an appointment : assign
Assigns the specified patient into the specified appointment date and time.
Format: assign PATIENT_INDEX d/DATE t/TIME [dur/DURATION]
- Puts the patient at the specified
PATIENT_INDEXinto an appointment time slot. - The
PATIENT_INDEXrefers to the index number indicated in the patient list. - The
PATIENT_INDEXmust be a positive integer 1, 2, 3, … - The
DATEandTIMEof the appointment must be included. - The
DURATIONis measured in minutes and will be defaulted to 60 minutes if omitted. - The time slot indicated by
DATEandTIMEmust be available. - The specified
DATEandTIMEmust be in the future.
Examples:
-
assign 1 d/Sunday t/2pm dur/40books an appointment of 40 minutes on the upcoming Sunday, 2am for the 1st patient in the list. -
assign 3 d/02-03-2021 t/1130books an appointment of 60 minutes on 02/03/2021, 11:30am for the 3rd patient in the list.
Step-by-step illustration:
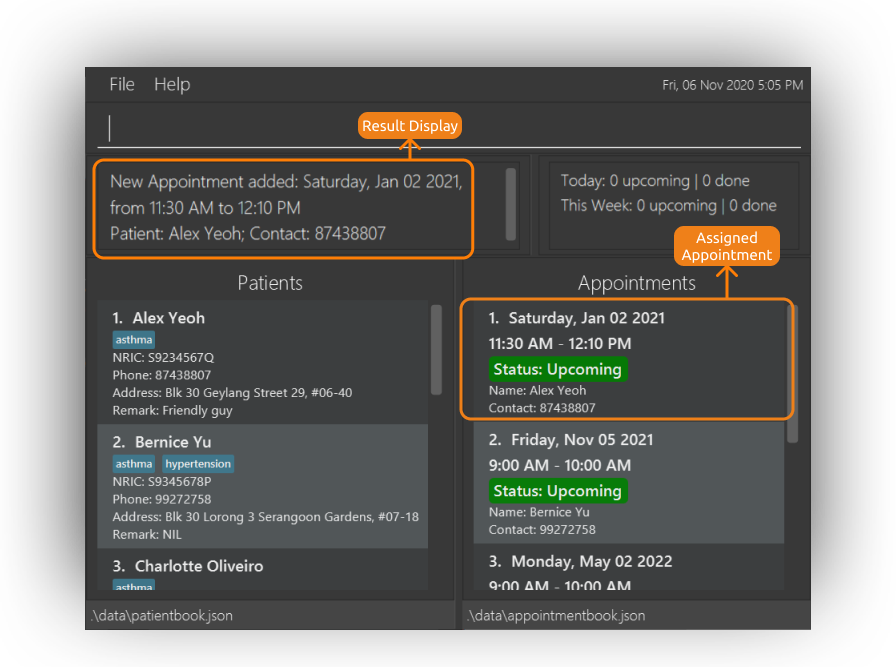
Suppose Alex Yeoh, the first patient in the list calls to book an appointment on 02 Jan 2021 at 1130, you can:
-
Enter
assign 1 d/02 Jan 2021 t/1130in the command box.
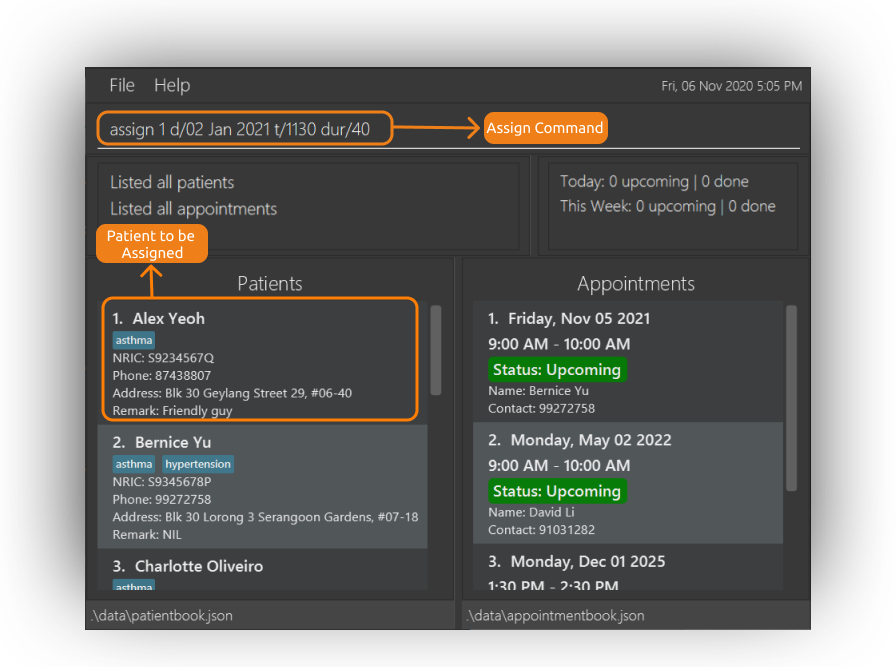
-
The information of the added appointment is displayed in the result display box.
Reschedules an existing appointment: change
If a patient wish to change his/her appointment details, you can use this command to assist you. It helps you to reschedule or modify an existing appointment with a new date, time or duration.
Do note that duration is measured in minutes and must be at least 10 minutes long!
Format: change APPT_INDEX [d/DATE] [t/TIME] [dur/DURATION]
If you would only like to change the duration of an appointment while keeping it’s original date and time, simply enter the new
DURATION with it’s corresponding APPT_INDEX! There is no need to retype it’s date and time. The same
applies for the other fields.
-
Reschedules an appointment at the specified
APPT_INDEXfor the patient it is tagged to. - Please click here to refer to important formatting information for the
DATE,TIMEandDURATIONfields. - At least one optional field must be provided to successfully execute the change command.
- Appointment details will be updated according to the fields present in the user input. For fields that are absent, the appointment’s original data will be used.
Examples:
-
change 3 d/02-03-2021
Reschedules the 3rd appointment displayed in the appointment book to 2nd March 2021 with it’s original time, duration and patient. -
change 2 d/12-05-2021 t/1530 dur/60
Reschedules the 2nd appointment displayed in the appointment book to 12th May 2021, 3:30PM with a duration of 1 hour for it’s original patient. - If you wish to modify the duration of an existing appointment, simply call the command in the following format:
-
change 1 dur/NEW_DURATION:
Extends the duration of the first appointment atAPPT_INDEX1 to theNEW_DURATIONwith the same date and start time.
-
Step by step illustration:
Example 1: Changing date
-
Suppose a patient, Charlotte, wants to reschedule her appointment to the following day at the same time.
Simply typechange 1 d/tomorrowin the command box and press Enter.
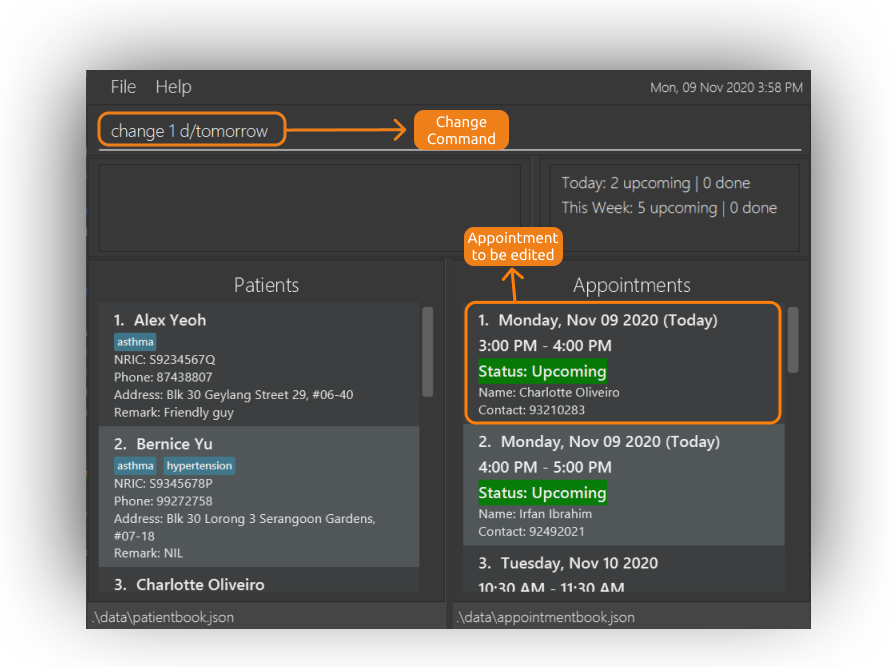
-
Charlotte’s original appointment on the 9th of November, 3-4pm is now successfully rescheduled to 10th November at the same time.

Example 2: Changing time and duration
- Suppose the nurse received updates from the dentist and is now required to increase the duration of Charlotte’s appointment to 1.5 hours
and as a result, has to push her appointment time-slot back to 7pm.
Simply enterchange 4 t/1900 dur/90in the command box and press Enter.
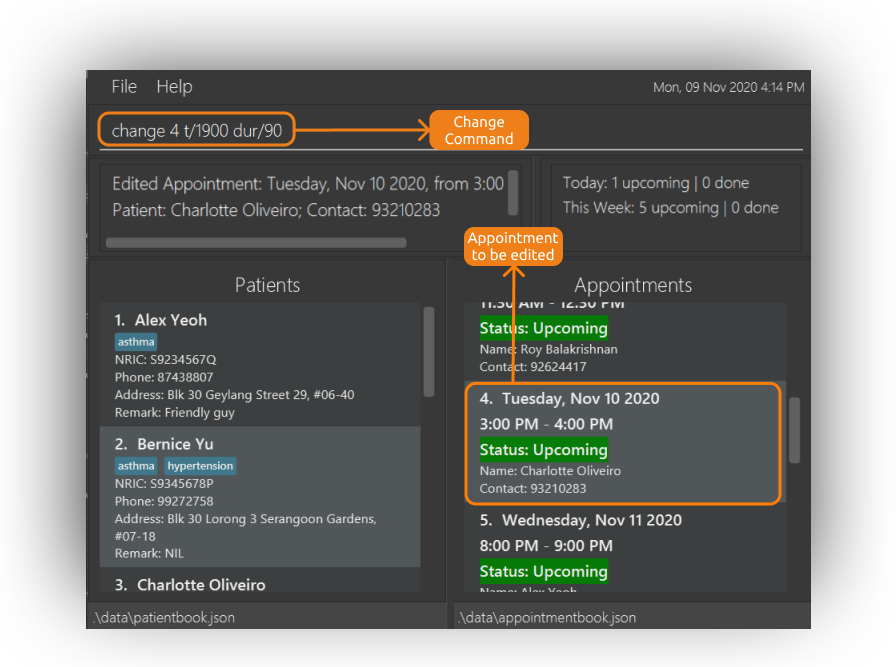
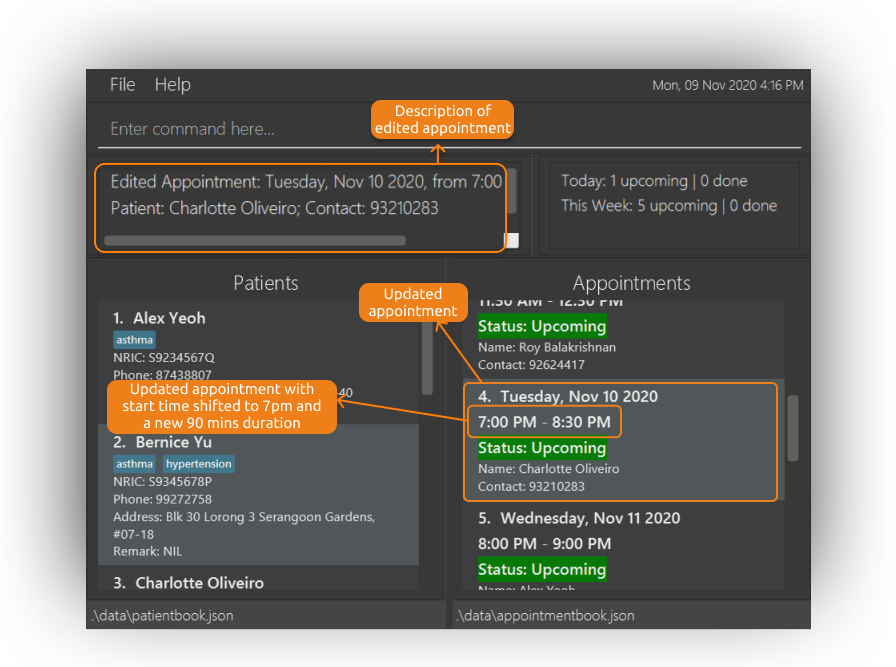
- Charlotte’s appointment is now shifted to 7pm with a new duration of 1.5 hour, thus resulting in a new end time at 8:30pm.
- Any other optional field combinations are supported as well.
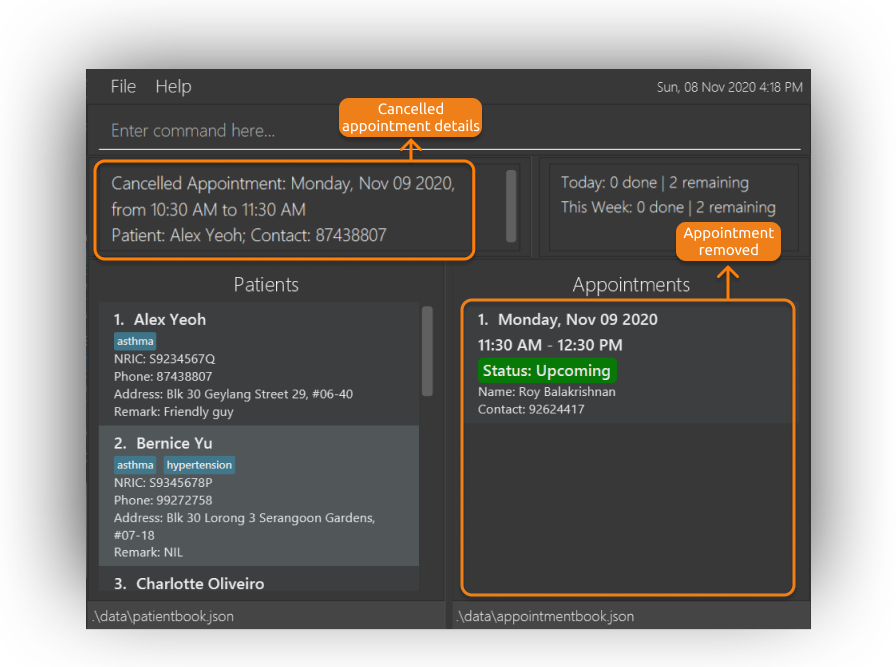
Canceling an appointment : cancel
Cancels the specified appointment and removes it from the appointment book.
Format cancel APPT_INDEX
Example:
-
viewfollowed bycancel 2deletes the 2nd appointment in the displayed appointment list. -
view d/todayfollowed bycancel 1deletes the 1st appointment happening on today’s date (if it exists).
Step-by-step illustration:
-
Suppose a patient calls to cancel his 10.30am appointment tomorrow, first get all the appointments for tomorrow by using the
view t/tomorrowcommand.
-
Next, look for the 10.30am appointment and cancel it using the
cancelcommand. Here, we usecancel 1as the appointment to cancel is the first appointment in the book.
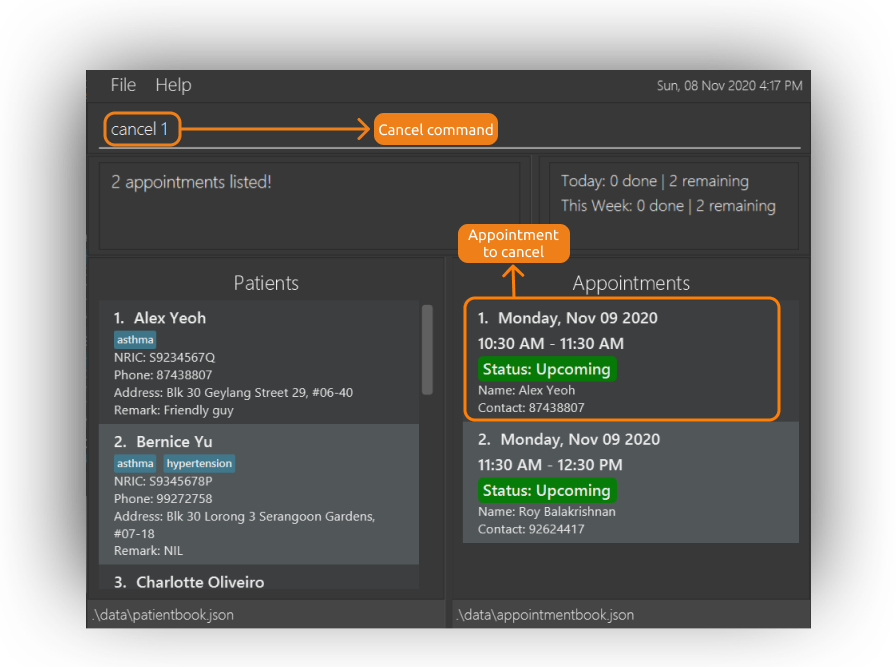
-
The 10.30am appointment is cancelled and removed from the appointment book. The cancelled appointment details is also displayed in the result display box.
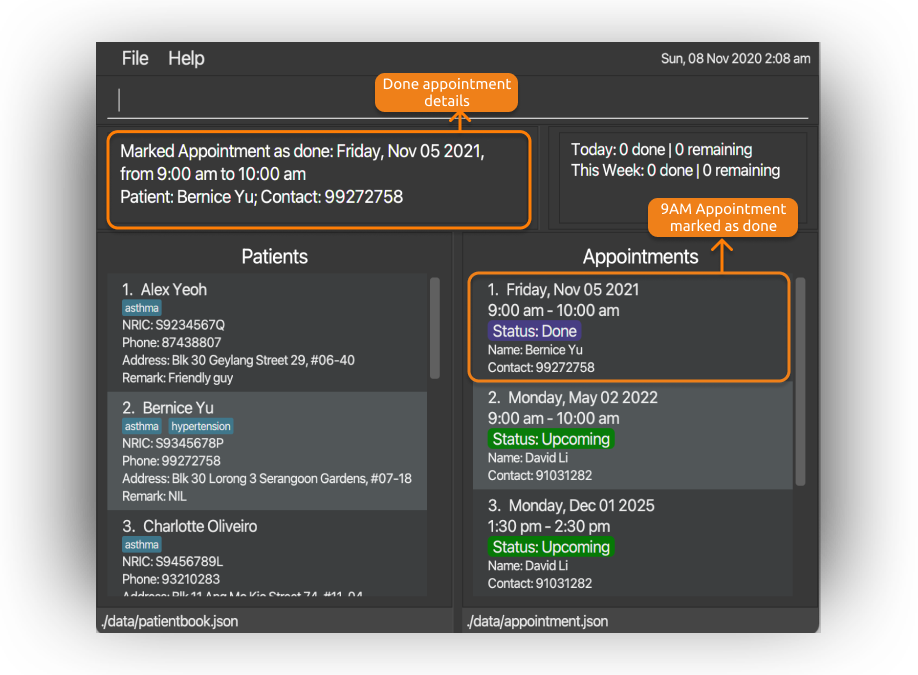
Marking an appointment as done : done
Marks a specific appointment in the patient book as done.
Format: done APPT_INDEX
- Marks the appointment at the specified
APPT_INDEXas done. - The
APPT_INDEXrefers to the index number indicated in the displayed appointment list. - The
APPT_INDEXmust be a positive integer 1, 2, 3, … - The indicated appointment should be an appointment that has not been marked before.
Example:
-
done 3marks the 3rd appointment in the displayed appointment list as completed. -
view d/todayfollowed bydone 1marks the 4th appointment happening on today’s date as completed.
Step-by-step illustration:
-
Enter
done 1in the command box

-
The result display box shows the success message and the appointment is marked as down
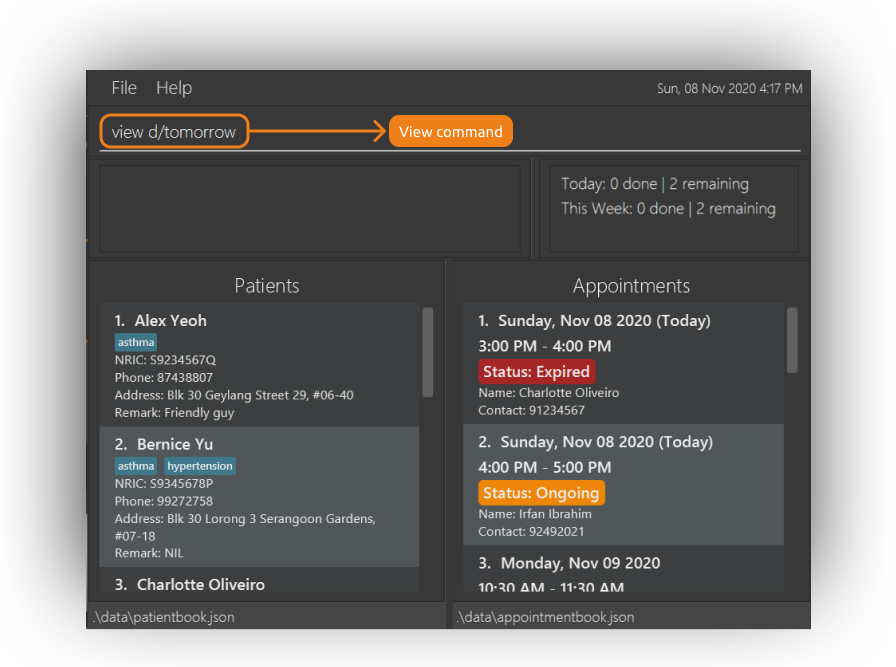
Listing upcoming appointments by date : view
Shows a list of all upcoming appointments entries or only the list of upcoming appointments happening on the specified date.
Format view [d/DATE]
- Outputs the list of all upcoming appointments happening on the specified date in chronological order.
- The specified
DATEmust be in the future. - If
DATEis not specified,viewwill output the list of all upcoming appointments in chronological order.
Example:
-
viewshows the list of all upcoming appointments in chronological order. -
view d/4-Aug-2020shows the list of appointments happening on 04/08/2020.
Step by step illustration:
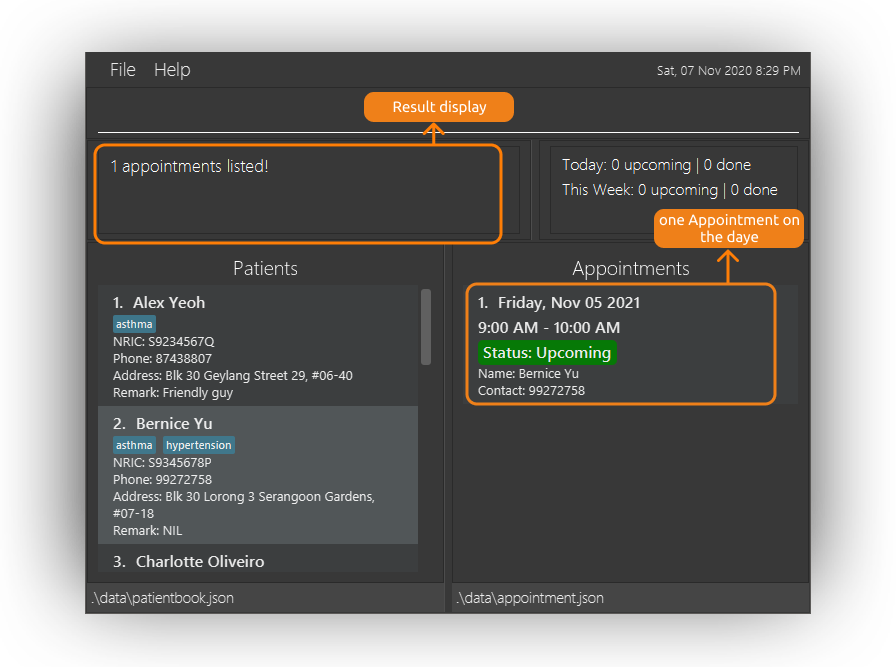
Suppose you want to check all the appointments on 05 nov 2021, you can:
- Enter
view d/05 Nov 2021.

- The number of appointments on that date are displayed in the result display box and the appointment details are displayed in the appointment book.
Listing available time slots by date : avail
Shows a list of all available (free) time slots within the operation time of the clinic on a specified date. The earliest available time slot on the specified date is also provided.
Format: avail d/DATE
- Outputs the list of all available time slots within the operation time of the clinic on a specified date in chronological order.
- The earliest available time slot within the operation time of the clinic on a specified date will also be displayed.
-
DATEmust be today or in the future. - Do note that the earliest available time slot will not be provided when
avail d/todayis executed after clinic’s operation hour.
Example:
-
avail d/4-Aug-2020shows the list of all available (free) time slots within the operation time of the clinic on 04/08/2020. -
avail d/todayshows the list of all available (free) time slots within the operation time of the clinic today.
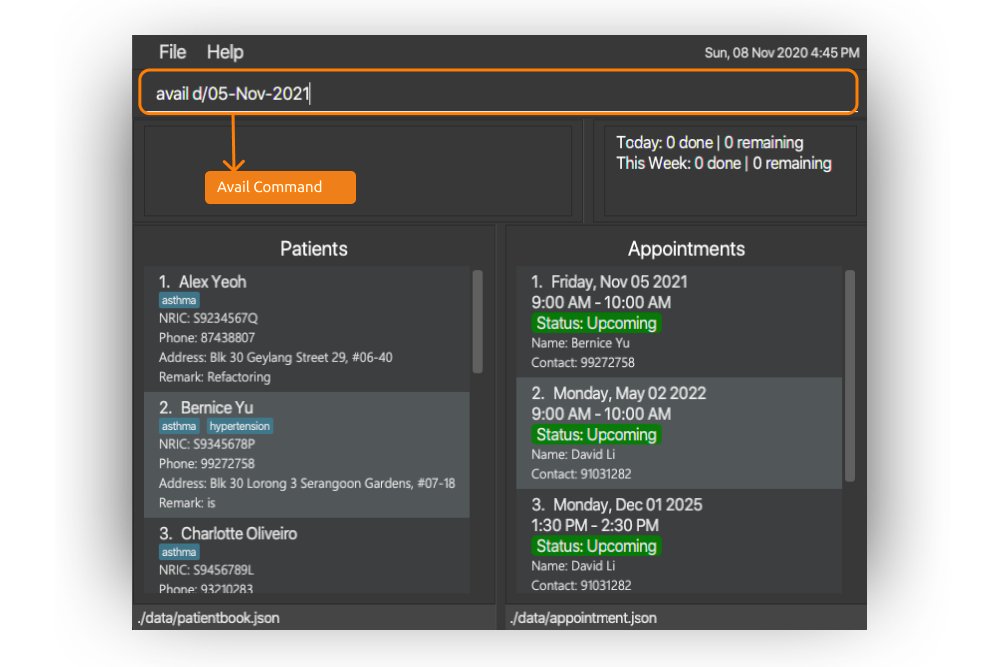
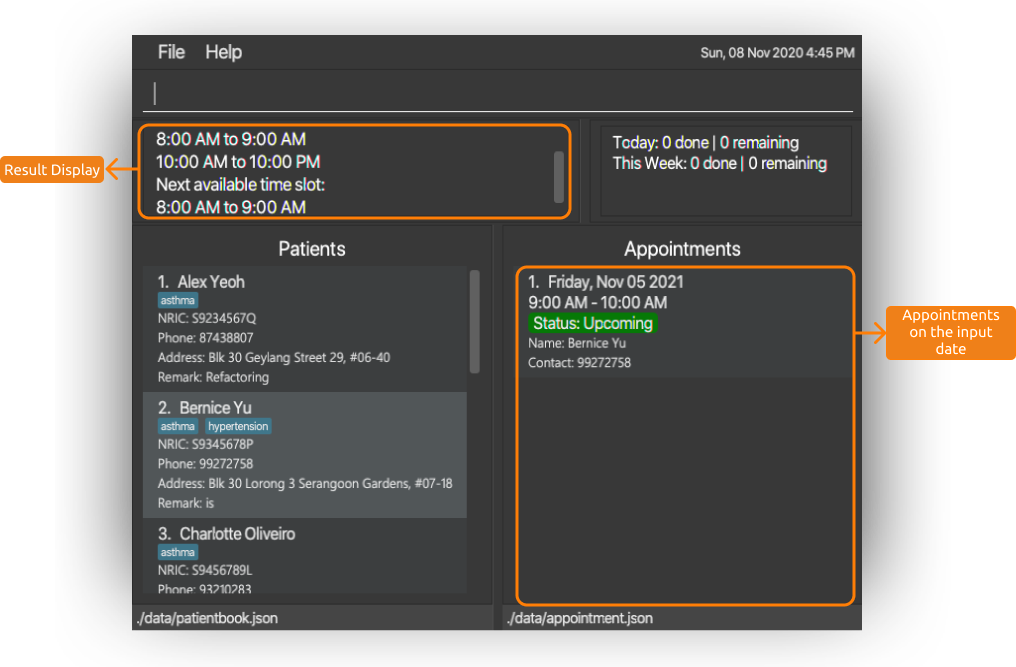
Step-by-step illustration:
-
Enter
avail d/05-Nov-2021in the command box.
-
The available time slots of the day and the earliest available time slot is displayed in the result display box. The list of appointments on the specified date is also displayed.
Command summary
General
| Action | Format |
|---|---|
| Help | help |
| Undo | undo |
| Redo | redo |
| Clear | clear |
| Exit | exit |
Patient Management
| Action | Format | Examples |
|---|---|---|
| Add | add n/NAME i/NRIC p/PHONE_NUMBER a/ADDRESS [t/TAG]… |
add n/James Ho i/S9712345G p/22224444 a/123, Clementi Rd, 1234665 t/asthma t/ |
| Edit | edit PATIENT_INDEX [n/NAME] [i/NRIC] [p/PHONE_NUMBER] [a/ADDRESS] [r/REMARK] [t/TAG]… |
edit 2 n/James Lee a/College Avenue 8 |
| Delete | delete PATIENT_INDEX |
delete 3 |
| Remark | remark PATIENT_INDEX [r/REMARK] |
remark 2 r/Has been visiting Dr John, remark 2
|
| List | list |
list |
| Find | find [n/NAME [MORE_NAMES]] [i/NRIC [MORE_NRICS]] [p/PHONE_NUMBER [MORE_PHONE_NUMBERS]] |
find n/James Jake i/S9124632H S9812567H |
Appointment Management
| Action | Format | Examples |
|---|---|---|
| Assign | assign PATIENT_INDEX d/DATE t/TIME [dur/DURATION] |
assign 3 d/tomorrow t/3pm |
| Change | change APPT_INDEX [d/DATE] [t/TIME] [dur/DURATION] |
change 3 d/02-03-2021 t/1130 dur/30 |
| Cancel | cancel APPT_INDEX |
cancel 1 |
| Done | done APPT_INDEX |
done 2 |
| View | view [d/DATE] |
view d/today |
| Available | avail d/DATE |
avail d/12-Apr-2021 |
FAQ
Q: How do I transfer my data to another Computer?
A: Install the application in the other computer and overwrite the empty data folder it creates with the data folder from your previous Nuudle’s home folder.
Q: What are the acceptable date time format?
A: Nuudle supports multiple date time formats as well as natural date time language. The details can be found here
Q: My data was accidentally deleted and I can’t undo it. How do I restore my data?
A: You can restore the data from your previous session by following the steps below:
- Look for a backup file in the data folder of your Nuudle’s home folder.
- Open the backup file and copy the 2 data files inside.
- Navigate back to the main data folder in your Nuudle’s home folder.
- Override the current data files in the main data folder by pasting the previously copied files.
- The previous session’s data is now restored and you can access it by starting up the Nuudle application.
Glossary
This glossary provides definitions for the special terms used in the user guide.
Index: The number on the left side of the corresponding entry in the patient or appointment book.
Tag: A word or phrase that indicates the medical condition of a patient.
GUI: An acronym that stands for Graphic User Interface.
CLI: An acronym that stands for Command Line Interface.
Command: The text typed in by the user as an instruction for Nuudle.
Case-insensitive: The treatment of uppercase and lowercase letters in the same way.
Patient book: A list that contains all the patients.
Appointment book: A list that contains all the appointments of the patients.
Operating Hours: The working period of the clinic. This is set from 8:00am to 10:00pm by default.