Developer Guide
- Introduction
- Setting up, getting started
- Design
- Implementation
- Documentation, logging, testing, configuration, dev-ops
- Appendix: Requirements
- Appendix: Instructions for manual testing
Introduction
This document is the developer guide for Nuudle, an appointment scheduling app for nurses.
This developer guide serves to provide developers with an understanding on how Nuudle is designed.
Setting up, getting started
Refer to the guide Setting up and getting started.
Design
This section describes the design & implementation of Nuudle using a top-down design.
Architecture
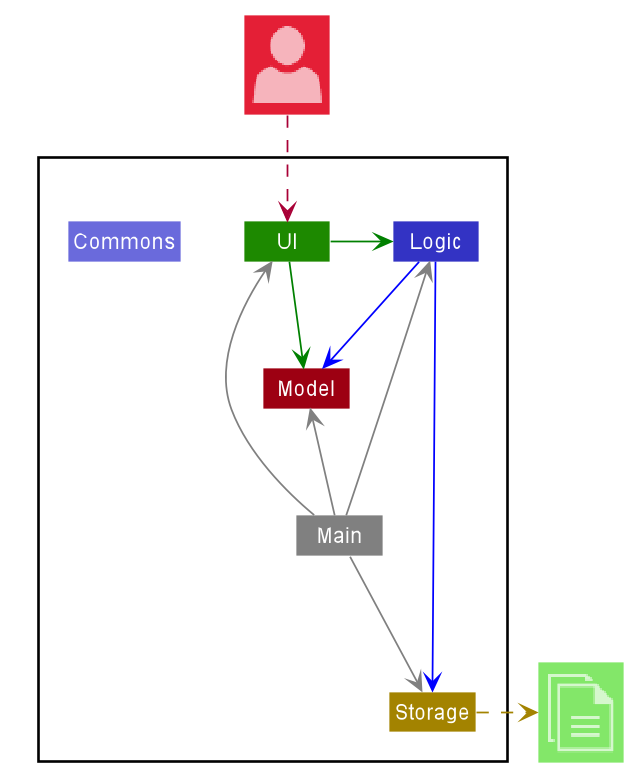
The Architecture Diagram given above explains the high-level design of the App. Given below is a quick overview of each component.
.puml files used to create diagrams in this document can be found in the diagrams folder. Refer to the PlantUML Tutorial at se-edu/guides to learn how to create and edit diagrams.
Main has two classes called Main
and MainApp. It is responsible for,
- At app launch: Initializes the components in the correct sequence, and connects them up with each other.
- At shut down: Shuts down the components and invokes cleanup methods where necessary.
Commons represents a collection of classes used by multiple other components.
The rest of the App consists of four components.
-
UI: The UI of the App. -
Logic: The command executor. -
Model: Holds the data of the App in memory. -
Storage: Reads data from, and writes data to, the hard disk.
Each of the four components,
- defines its API in an
interfacewith the same name as the Component. - exposes its functionality using a concrete
{Component Name}Managerclass (which implements the corresponding APIinterfacementioned in the previous point.
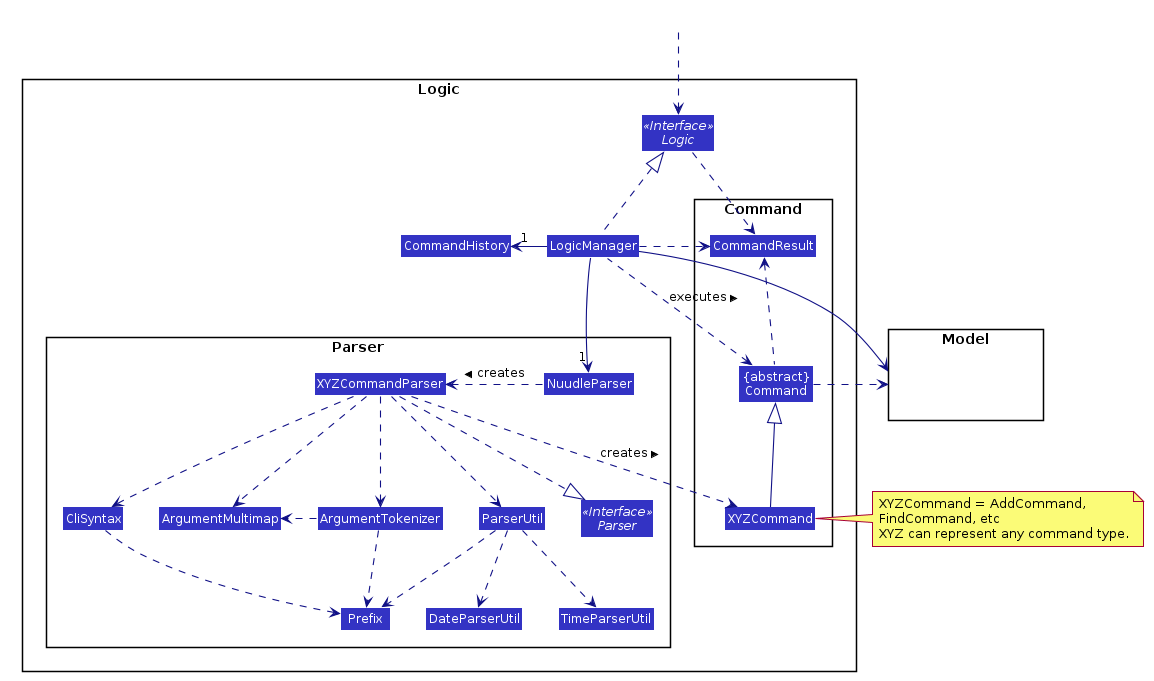
For example, the Logic component (see the class diagram given below) defines its API in the Logic.java interface and exposes its functionality using the LogicManager.java class which implements the Logic interface.
How the architecture components interact with each other
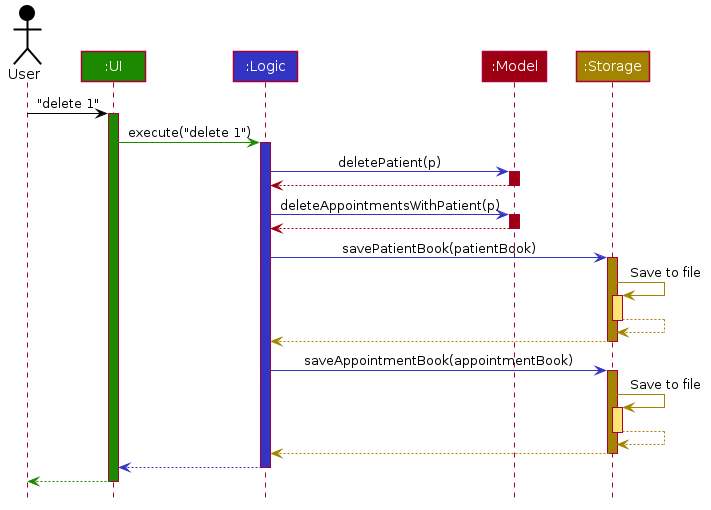
The Sequence Diagram below shows how the components interact with each other for the scenario where the user issues the command delete 1.
The sections below give more details of each component.
UI component
API :
Ui.java
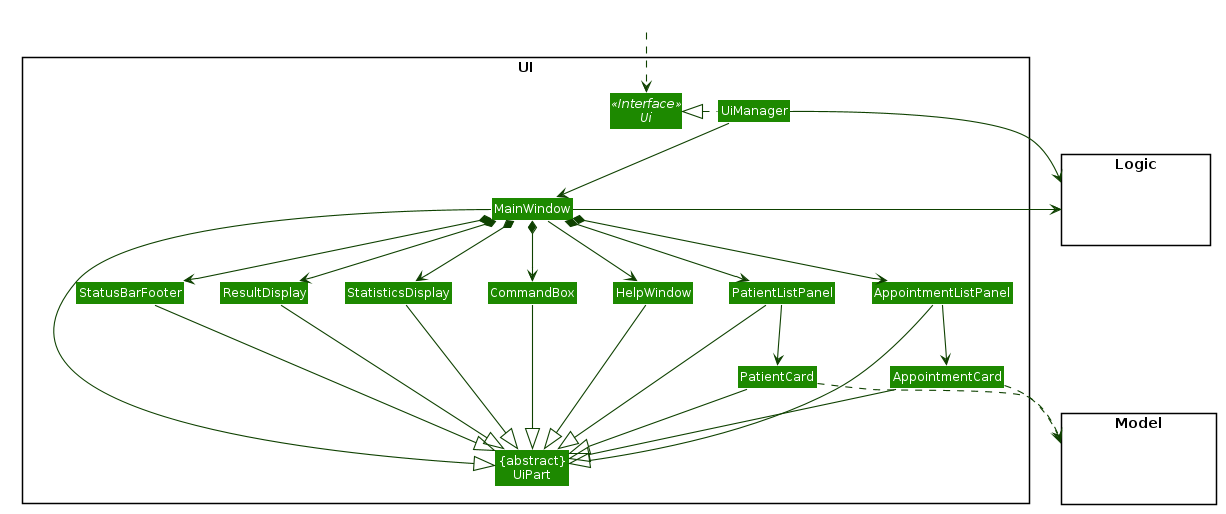
The UI consists of a MainWindow that is made up of parts e.g.CommandBox, ResultDisplay, StatisticsDisplay, AppointmentListPanel, PatientListPanel, StatusBarFooter etc. All these, including the MainWindow, inherit from the abstract UiPart class.
The UI component uses JavaFx UI framework. The layout of these UI parts are defined in matching .fxml files that are
in the src/main/resources/view folder. For example, the layout of the MainWindow is specified in MainWindow.fxml
The UI component,
- Executes user commands using the
Logiccomponent. - Listens for changes to
Modeldata so that the UI can be updated with the modified data.
Logic component
API :
Logic.java
-
LogicManagerimplements theLogicinterface and uses theNuudleParserclass to parse the user command with theexecutemethod. -
This results in a
Commandobject which is then executed by theLogicManager.
-
The command execution can affect the
Model(e.g. adding or deleting a patient). -
The result of the command execution is encapsulated as a
CommandResultobject which is passed back to theUi. -
In addition, the
CommandResultobject can also instruct theUito perform certain actions, such as displaying help to the user.
Given below is the Sequence Diagram for interactions within the Logic component for the execute("delete 1") API call.
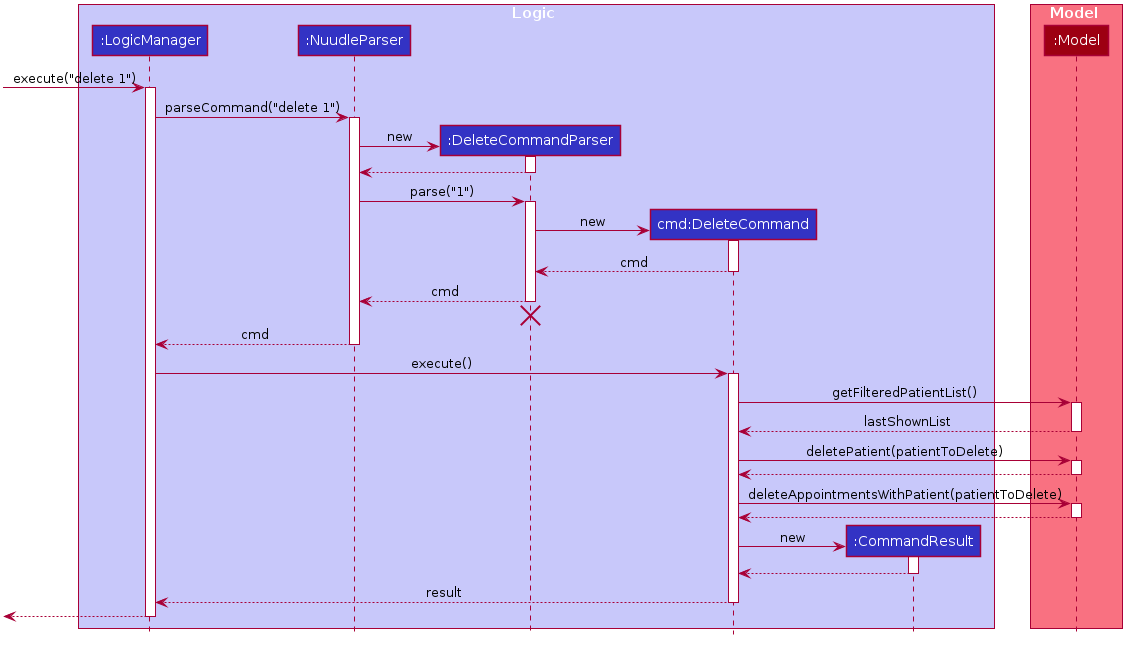
DeleteCommandParser should end at the destroy marker (X) but due to a limitation of PlantUML, the lifeline reaches the end of diagram.
Model component
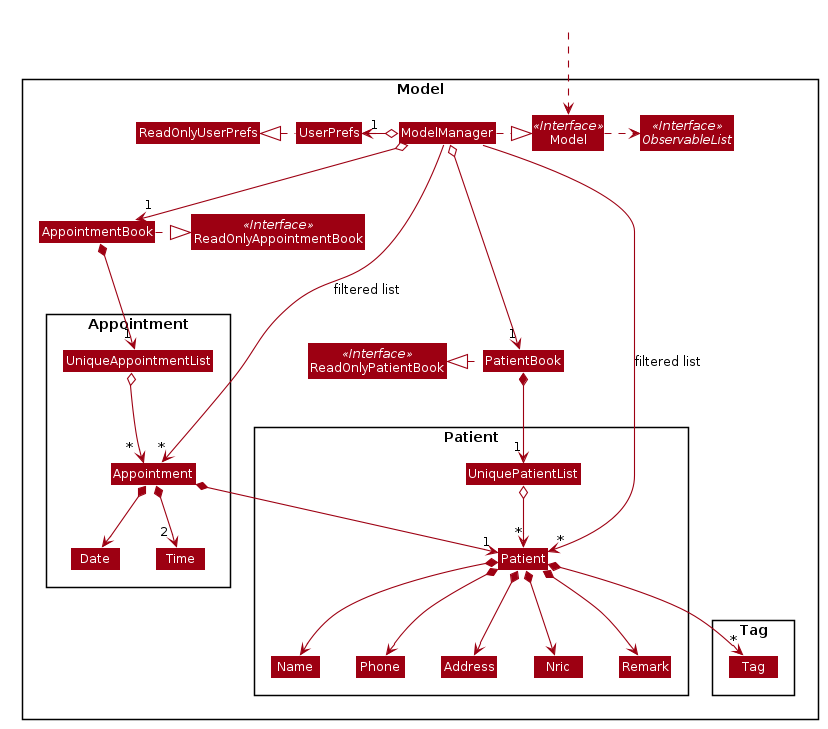
API : Model.java
The Model,
- stores a
UserPrefobject that represents the user’s preferences. - stores the patient book data and appointment book data.
- exposes an unmodifiable
ObservableList<Patient>and an unmodifiableObservableList<Appointment>that can be ‘observed’ e.g. the UI can be bound to these lists so that the UI automatically updates when the data in the list change. - does not depend on any of the other three components.
Tag list in the PatientBook, which Patient references. This allows PatientBook to only require one Tag object per unique Tag, instead of each Patient needing their own Tag object.
Storage component
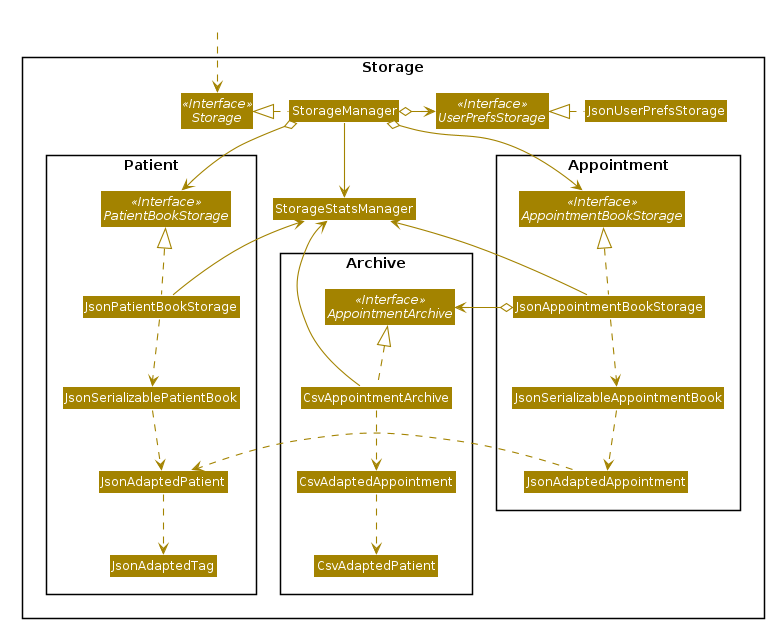
API : Storage.java
The Storage component,
- can save
UserPrefobjects in json format and read it back. - can save the patient book data in JSON format and read it back.
- can save the appointment data in JSON format and read it back.
- can save the appointment data in CSV format for archiving.
- can handle files with invalid data by removing only the corrupted/invalid data.
Common classes
Classes used by multiple components are in the seedu.patientbook.commons package.
Implementation
This section describes some noteworthy details on how certain features are implemented.
1. Done feature
[written by: Yang Yue]
The mark done feature allows users to mark a specific appointment in the appointment book as done using APPT_INDEX to specify the appointment in the list of appointments.
1.1 Implementation
Command: done APPT_INDEX
Example Usage:
done 1done 4
The mark appointments as Done feature is facilitated by the DoneCommand, which extends the abstract class Command, and
the DoneCommandParser, which implements the Parser interface. Both of these classes are part of the Logic component.
The following is an example usage scenario on how the mark as done mechanism works in each step:
-
User types
done INDEXinto the app. -
The request is handled by
LogicManager#execute(String), which then calls and passes the input to theNuudleParser#parseCommand(String)method. -
NuudleParserdetects the command worddonein the input string and creates a newDoneCommandParserto parse inputs according to the format specified forDoneCommand. -
Input is parsed using the
DoneCommandParser#parse(String)method, which also performs input validation. -
The
DoneCommandParsercreates a newDoneCommandinstance with the given index and returns it toNuudleParser, which in turn returns it toLogicManager. -
LogicManagercalls theDoneCommand#execute(Model)method. -
DoneCommandobtains a copy of theFilteredAppointmentListby calling theModel#getFilteredAppointmentList()method.
-
DoneCommandreturns the appointmenttoMarkin theFilteredAppointmentList, if an appointment can be found by the given index. Otherwise, throw anAPPOINTMENT_DOES_NOT_EXISTSexception. -
DoneCommandcreates another instance of this appointmentdoneAppointmentwhich has adonestatus. -
DoneCommandreplaces thetoMarkwith thedoneAppointmentby calling theModel#setAppointment(Appointment, Appointment). -
Lastly,
DoneCommandcreates aCommandResultwith aSuccessMessageand returns it toLogicManager.
The above process is shown in the following sequence diagram:
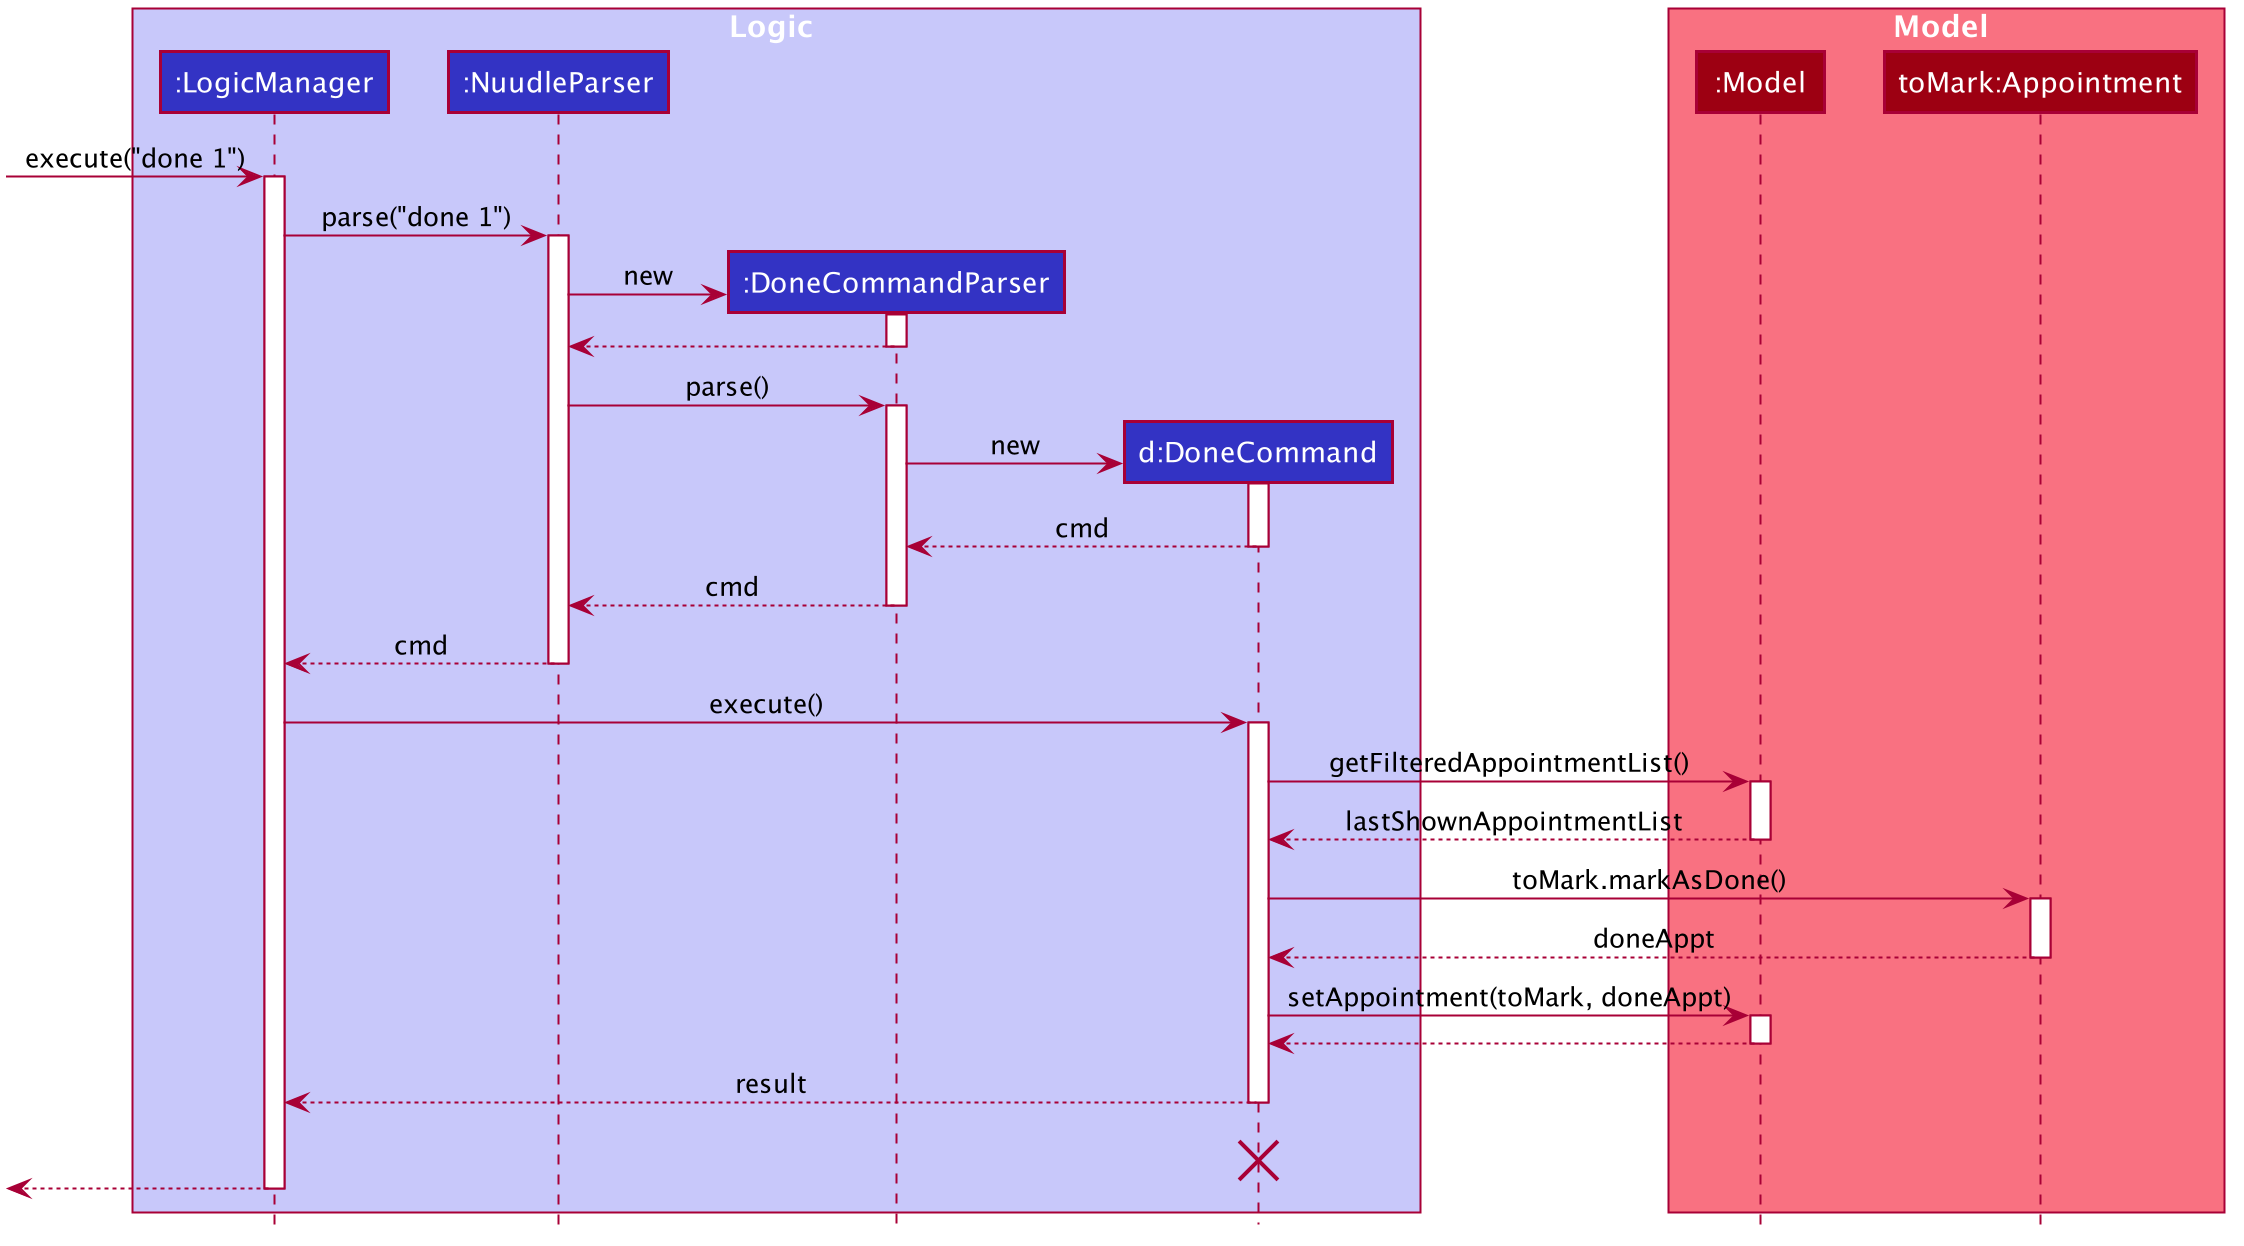
Diagram 1.1.1: Sequence diagram showcasing the Done Command process
The following activity diagram summarizes what happens when a user executes a new command:
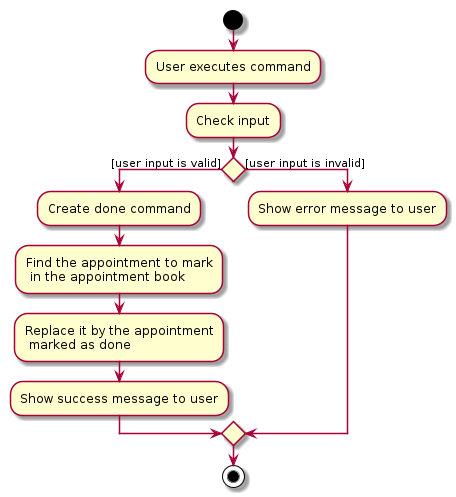
Diagram 1.1.2: Activity diagram showcasing the Done Command execution flow
1.2 Design consideration
Aspect: Input format
-
Alternative 1 (current choice): Use
APPT_INDEXto indicate the appointment to mark.- Pros: Easy to type. In this case, a user does not have to type in a long string to indicate the date and time. Easy to implement. We can find an appointment easily using the
APPT_INDEX. Otherwise, we need to create aDateTimeLoaderto locate the appointment in the appointment list. - Cons: The input does not show the date and time, so users have to scroll down the list to check whether the index points to the right appointment.
- Pros: Easy to type. In this case, a user does not have to type in a long string to indicate the date and time. Easy to implement. We can find an appointment easily using the
-
Alternative 2: Use
d/DATE t/TIMEas input- Pros: Without checking the list, users can tell whether the input is the right appointment they want to mark.
- Cons: It takes more time to type
d/DATE t/TIMEcomparing to a single numberINDEXin alternative 1.
2. Data archiving
[written by: Lim Jin Hao]
The data archiving feature will archive all past appointments into an archive directory on starting the app. The appointment data will be archived according to their months and saved as a CSV file.
The data archived will be minimal and only contains the following columns: date, startTime, endTime, isDone, name, phone, address and remark.
2.1 Implementation
The archive mechanism is facilitated by CsvAppointmentArchive which implements the AppointmentArchive interface.
It is stored internally within the JsonAppointmentBookStorage which in turn implements the AppointmentBookStorage interface.
CsvAppointmentArchive implements the following operations:
-
archivePastAppointments(..)— Removes all past appointments from the appointment book and archive the past appointments in CSV files. -
saveAppointments(..)— Saves the list ofCsvAdaptedAppointmentas a CSV file in the archive directory with the given filename. -
readAppointments(..)— Reads the CSV file with the given filename and returns the data as a list ofCsvAdaptedAppointment>
CsvAdaptedAppointment and CsvAdaptedPatient are used to represent the CSV-adapted Appointment and Patient respectively.
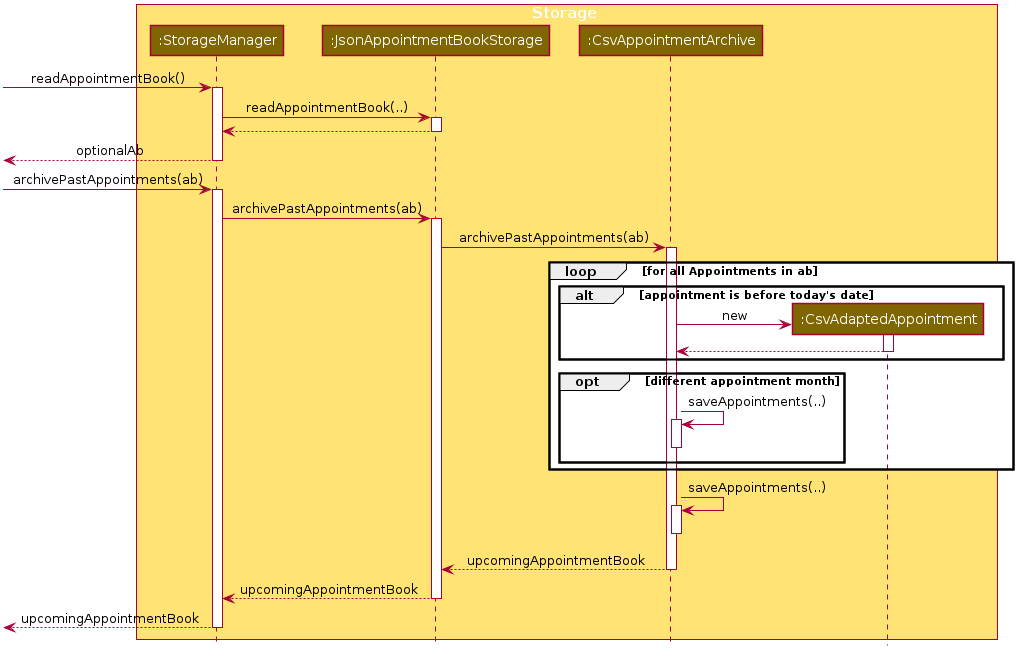
Diagram 2.1.1: Sequence diagram showcasing the Data Archiving process
Given below is an example startup scenario, which focuses on how the archive mechanism behaves at each step.
-
The user launches the application with some existing appointment data.
-
The
MainAppcalls theStorage#readAppointmentBook()method to get the appointment book with the existing appointment data. -
The appointment book is then passed to the
AppointmentArchivethrough theStorageandAppointmentBookStorageby calling their respectivearchivePastAppointments(..)methods. -
AppointmentArchivethen iterates through the appointment book and separates the appointments into a list of upcoming appointments, and a list of past appointments to be archived. -
For each past appointments, the
AppointmentArchivecreates a CSV-adapted version of the appointment,CSVAdaptedAppointment. -
The
CSVAdaptedAppointmentwill subsequently create a CSV-adapted version of the patient,CSVAdaptedPatientto be stored together with the appointment.
-
For each
CsvAdaptedAppointmentin the same month, theAppointmentArchivecalls thesaveAppointments(..)method to save them in a single CSV file. -
saveAppointments(..)will then call theCsvUtil#serializeObjectToCsvFile(..)method to serialise the appointments to CSV format and save them in a file with the following naming format:<YYYY>_<MMM>(For eg.2019_MAY) -
If the file already exists, the data will be appended to the bottom of the existing CSV file. Otherwise, a new file will be created with the CSV headers and the data of the archived past appointments.
-
The list of upcoming appointments will then be returned to the
MainAppthrough the call stack and will be used by the system as the starting appointment book data. -
The
Uicomponent will then call theLogic#getStorageStatus()component to get the status message of the archive operation from theStorageManager. -
The archive status message will then be displayed to the user via the GUI.
The retrieval of the status message is shown in the following sequence diagram:
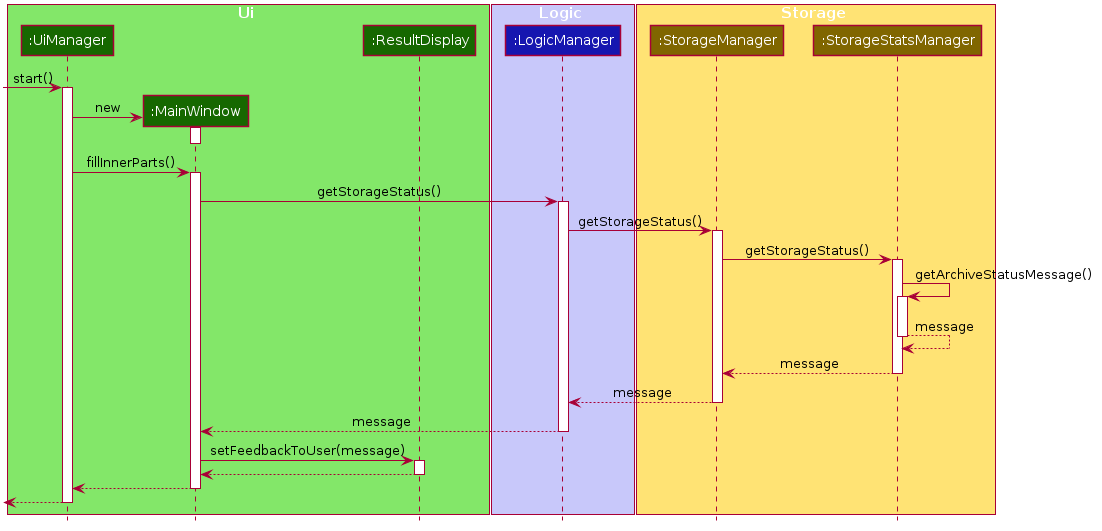
Diagram 2.1.2: Sequence diagram showcasing the archive message retrieval process
The following activity diagram summarises how the Nuudle selects and archive past appointments:
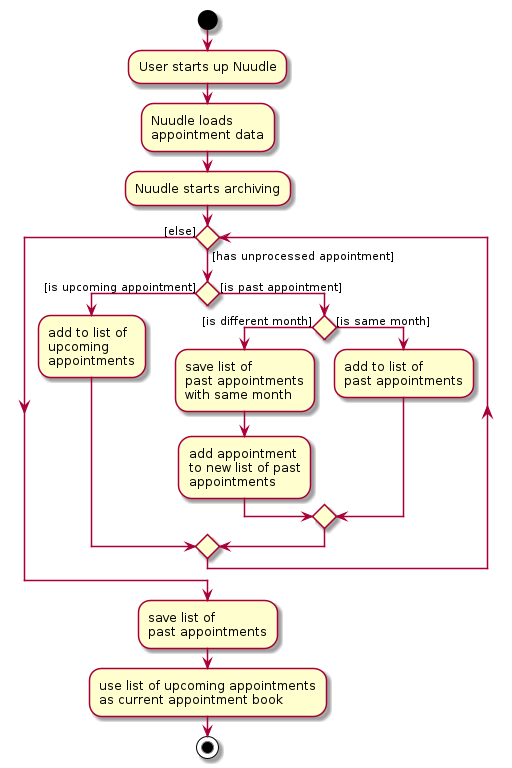
Diagram 2.1.3: Activity diagram showcasing the Data Archiving execution flow
2.2 Design consideration:
Aspect: Type of data to save in CSV format
As the data is to be saved in a CSV format, the data attributes of the Java Object cannot have complex data type such as a set, list or map.
CsvAdaptedAppointment and CsvAdaptedPatient classes are used to represent the archivable appointments and patient, so the consideration is to decide how and what data should be archived in the CSV file.
-
Alternative 1 (current choice): Only archive the necessary data and ignore certain data such as
Set<Tags>and sensitive data such as the patient’sNric.- Pros: Straightforward to implement. Easy to add and remove fields to be archived.
- Cons: Does not have the full appointment data and therefore
CsvAdaptedAppointmentcannot be used to recreateAppointment.
-
Alternative 2: Archive all appointment-related data. For complex data, convert them to their string equivalent and have methods to convert them back to the original state.
- Pros: Full data is saved and therefore the actual
Appointmentcan be recreated from the CSV data file. - Cons: We must ensure that the implementation of the conversion is correct and that the content of the data does not affect the conversion.
- Pros: Full data is saved and therefore the actual
3. Assign Feature
[written by: Zhang Wanlin]
The assign feature will allow the user to create a new appointment that is attached to a patient.
3.1 Implementation
The assign feature is implemented to allow users to assign a specified patient into a specified appointment date and time. To avoid cyclic dependency, only an Appointment has an attribute of Patient object instead of Appointment object and Patient object refer to each other.
This feature creates a new Appointment instance, which is stored in an instance of UniqueAppointmentList, which in turn is stored in the AppointmentBook. These classes are part of the model component.
The feature is supported by the AssignCommand class which extends the abstract class Command, and AssignmentCommandParser which implements the Parser interface. These classes are part of the logic component.
The following class diagram showcases the relationship between the main classes that support this command and key attributes and methods:
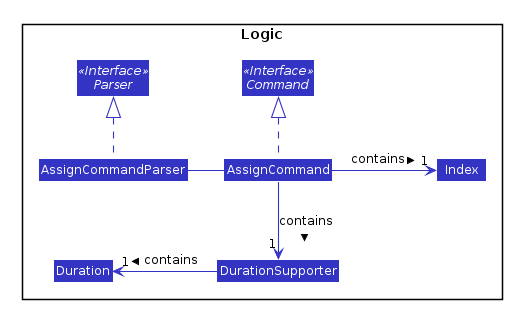
Diagram 3.1.1: Class diagram for classes involved in the assign feature of the Logic component
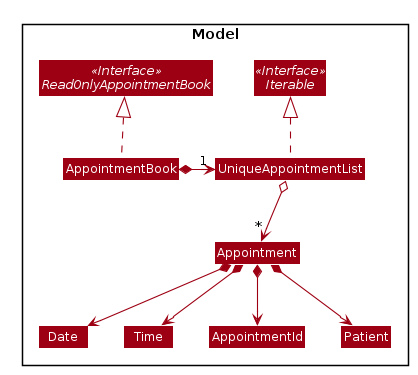
Diagram 3.1.2: Class diagram for classes involved in the assign feature of the Model component
Here below is an example usage scenario and how the assign feature works at each step:
-
User enters respective input into the app.
-
The input is handled by the
LogicManager#execute(String), which then calls and passes the input to theNuudleParser#parseCommand(String)method.
-
NuudleParserfinds out the command wordassignin the user input and creates anAssignCommandParserto parse the input according to the format specified forAssignCommand. -
AssignCommandParserparses the user input and checks the input validation for correct types (eg.IntegerforIndexand alphanumeric characters forName) via theAssignCommandParser#parser(String)method. -
AssignCommandParser#parse(String)calls the constructor ofIndexandDurationSupporter, and creates a newIndexinstance and a newDurationSupporterobject with the user input. It creates a newAssignCommandand passes theIndexandDurationSupporterto it. -
AssigCommandreturns the newCommandinstance to theAssignCommandParser, which in turn returns it toLogicManager. -
LogicManagercalls theAssignCommand#execute(Model)method. -
The
AssigCommand#execute(Model)method callsAssignCommand#createAppointment()to create anAppointment. -
This
Appointmentinstance is added into theModelviaModel#addAppointment(). -
The
Model#updateFilteredAppointmentList()calls to update thefilteredAppointmentListin the Model, and meanwhile checks if theDateandTimeof addedAppointmentoverlaps with otherAppointmentin the list. -
Lastly, the
AssignCommandcreates aCommandResultwithMESSAGE_SUCCESS, and returns it intoLogicManager.
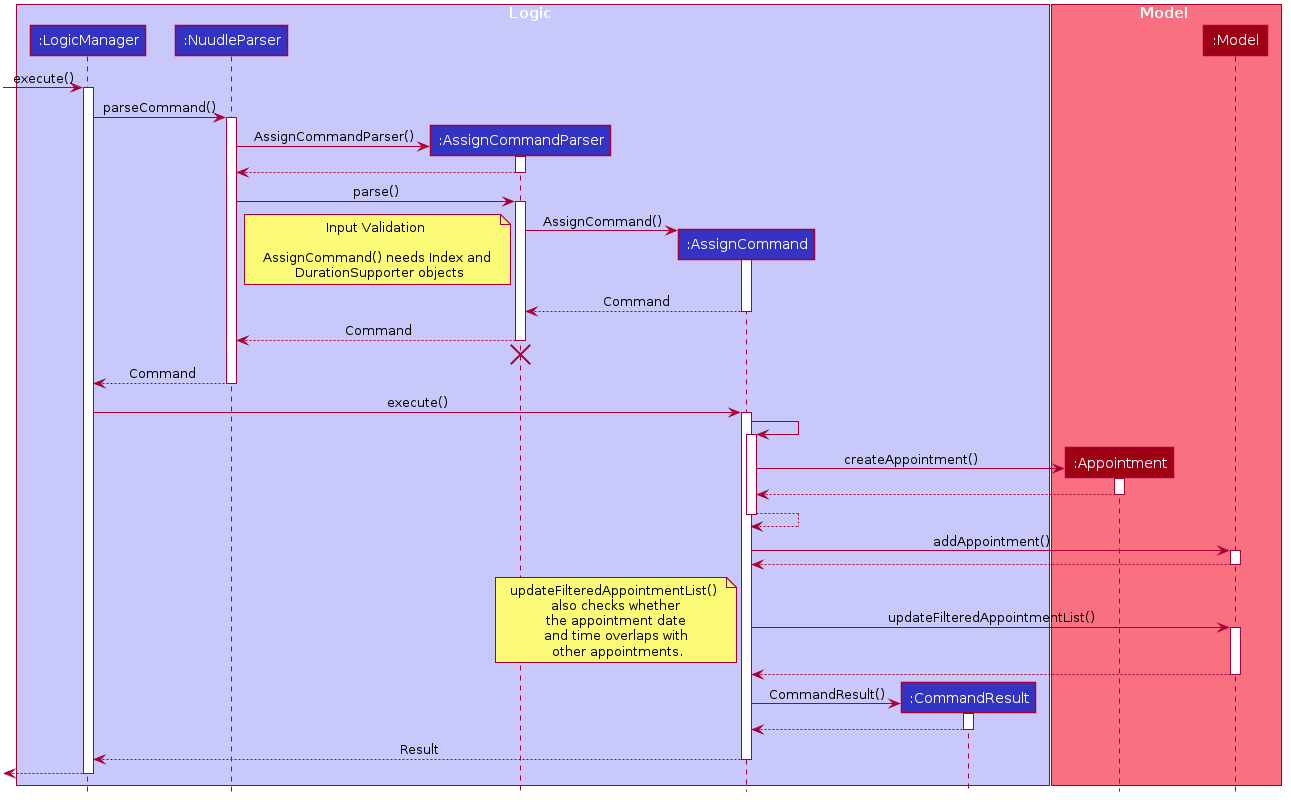
Diagram 3.1.3: Sequence diagram showcasing the Assign Command process
The following activity diagram summarises the general workflow for the Assign Command:
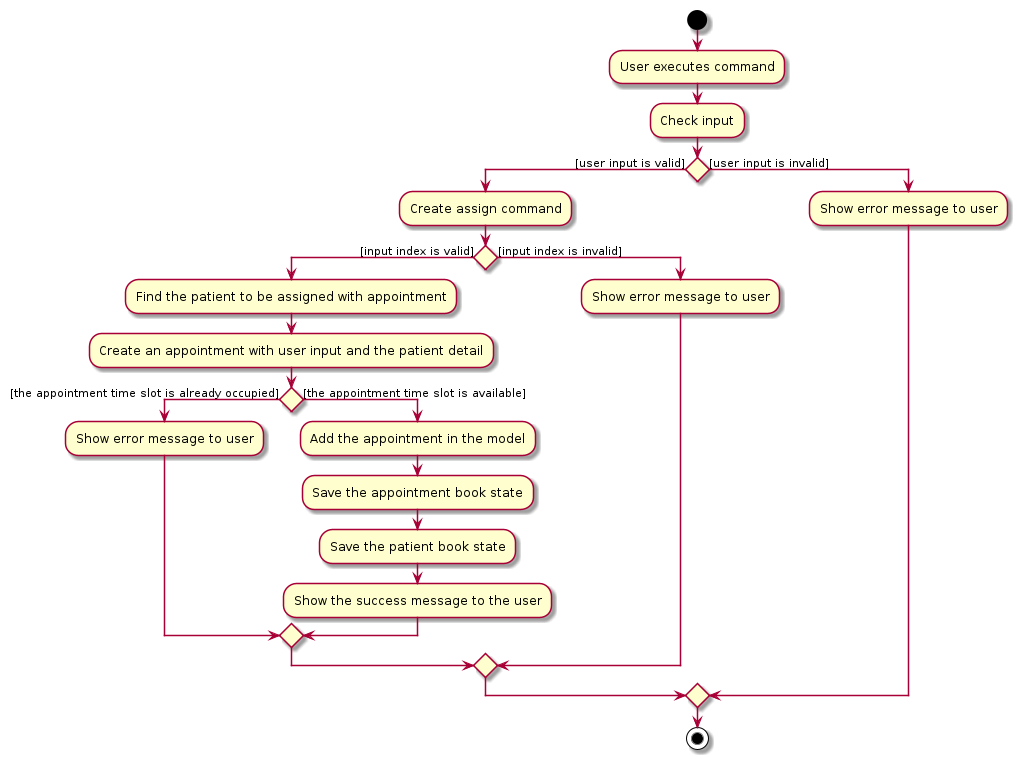
Diagram 3.1.4: Activity diagram showcasing the Assign Command execution flow
3.2 Design Considerations
Aspect: How the assign command executes
-
Alternative 1 (current choice): Separate parsing from code execution
- Pros: Clear distinction between class responsibilities.
- Cons: More code, may increase coupling as objects are passed around between the classes.
-
Alternative 2: Parse and Execute in the same class
- Pros: Less code, less fields/objects are passed between classes.
- Cons: No separation between classes violates the Single Responsibility Principle. It also makes debugging harder since more functions are squeezed in one big class. Also, it may be harder for further developers to understand since the design would vary from the
Addcommand forPatient(adapted from AddressBookLevel3).
Aspect: How to store the Appointment instances
-
Alternative 1 (current choice): Store in a separate
UniqueAppointmentListclass- Pros: It is easier to manage
Appointmentin a separate class since many additional methods can be implemented to empower the management. Thus, This is also beneficial for otherAppointmentrelated commands. - Cons. Another class would lead to more memory usage. Since the target user needs to keep the app running, this could be disadvantageous.
- Pros: It is easier to manage
-
Alternative 2: Store inside
Patientinstances, i.e. inUniquePatientList.- Pros: Separating list is no longer needed and the usage of
UniquePatientListwould be enlarged. This might be better for hardware memory performance. - Cons: It hardens the issue of maintaining
Appointmentinstances since the logic is that aPatientcould have multipleAppointmentbut not the other way. As such, it would be harder forPatientrelated commands (find) to find thePatientand all hisAppointmentat once.
- Pros: Separating list is no longer needed and the usage of
4. Edit Patient Feature
[written by: Xin Zhe]
The Edit Patient Feature allows the nurse to edit an existing Patient in the patient book.
Appointment which involves the patient will be updated accordingly.
4.1 Implementation
The Edit Patient Feature is facilitated by the EditCommand, which extends the abstract class Command,
and the EditCommandParser, which implements the Parser interface. All of these classes are part of the Logic component.
This feature is supported by the UniquePatientList which stores the patient instances and the UniqueAppointmentList
which stores the appointment instances. These classes are part of the model component.
Additionally, a public static class EditPatientDescriptor is nested in EditCommand as a container class to store the details to edit the Patient with.
It also implements the following operations:
-
EditCommand#createEditedPatient(Patient patientToEdit, EditPatientDescriptor editPatientDescriptor)— Creates apatientwith the details ofpatientToEditedited witheditPatientDescriptor.
Given below is an example usage scenario and how the edit mechanism behaves at each step.
1: The user types edit INDEX [n/NAME] [p/PHONE] [i/NRIC] [a/ADDRESS] [r/REMARK] [t/TAG]… into Nuudle.
2: The request is handled by LogicManager#execute(String), which then calls and passes the input to the NuudleParser#parseCommand(String) method.
3: NuudleParser detects the command word edit in the input string and creates a new EditCommandParser to parse inputs according to the format specified for EditCommand.
4: Input is parsed using the EditCommandParser#parse(String) method, which also performs input validation. The method creates a EditPatientDescriptor using the parsed inputs by calling the static constructor inside EditCommand.
5: The EditCommandParser creates a new EditCommand instance with the given index and newly created EditPatientDescriptor object and returns it to NuudleParser, which in turn returns it to LogicManager.
6: LogicManager calls the EditCommand#execute(Model) method.
7: EditCommand obtains a copy of the FilteredPatientList by calling the Model#getFilteredPatientList() method. This is used to check if the patient index supplied by the user exists in Nuudle.
8: EditCommand creates a new patient specified by the EditPatientDescriptor by calling its own private static method EditCommand#createEditedPatient(Patient, EditPatientDescriptor).
9: EditCommand checks whether there are duplicate patients in the patient book by calling Model#hasPatient(Patient) method.
10: EditCommand edits the patient at a given index by calling Model#setPatient(Patient, Patient);
11: EditCommand edits the appointment in the UniqueAppointmentList which contains the edited patient by calling Model#updateAppointmentsWithPatient(Patient, Patient) method.
12: EditCommand updates the filtered list by calling Model#updateFilteredPatientList(Predicate) method.
13: EditCommand updates the filtered list by calling Model#updateFilteredAppointmentList(Predicate) method.
14: Lastly, EditCommand creates a CommandResult with SuccessMessage and Patient and returns it to LogicManager.
The above process is shown in the following sequence diagram:
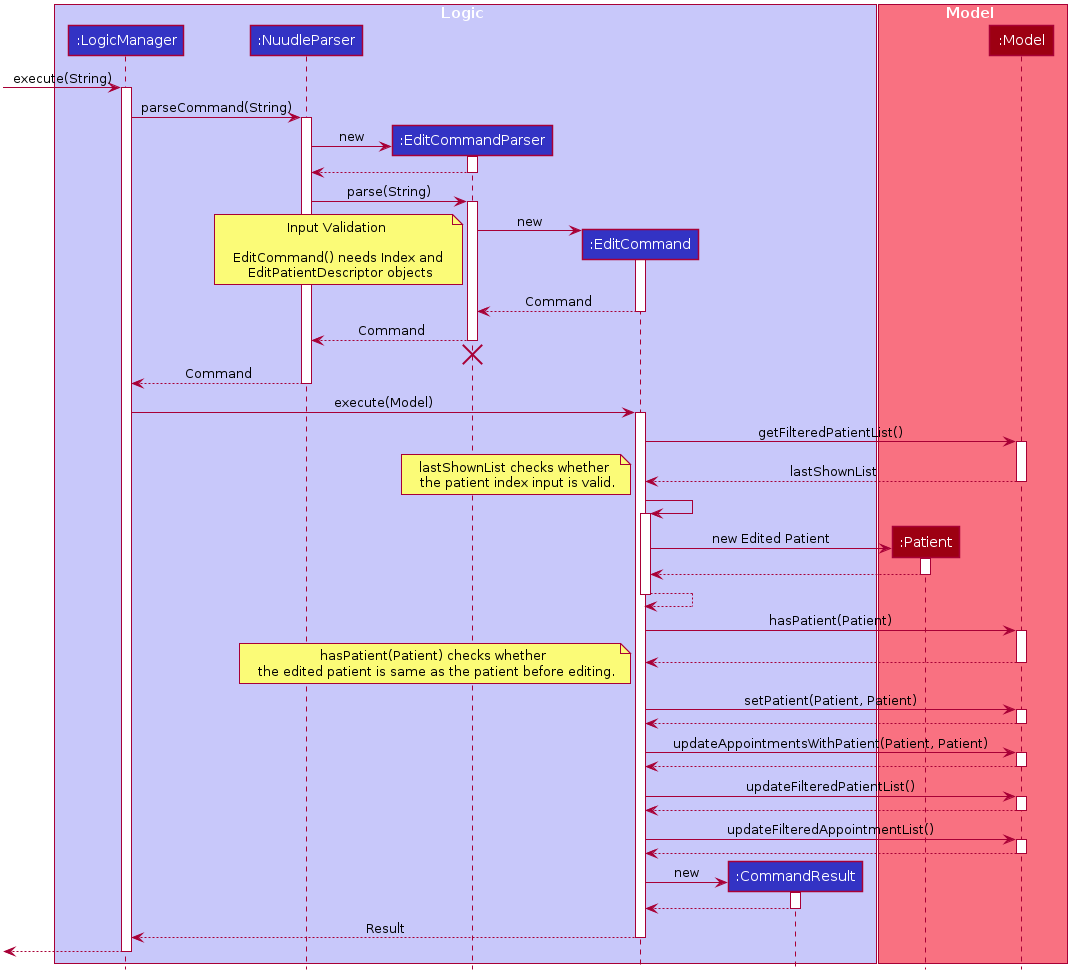
Diagram 4.1.1: Sequence diagram showcasing the Edit Command process
The following activity diagram summarises the general workflow for the Edit Command:
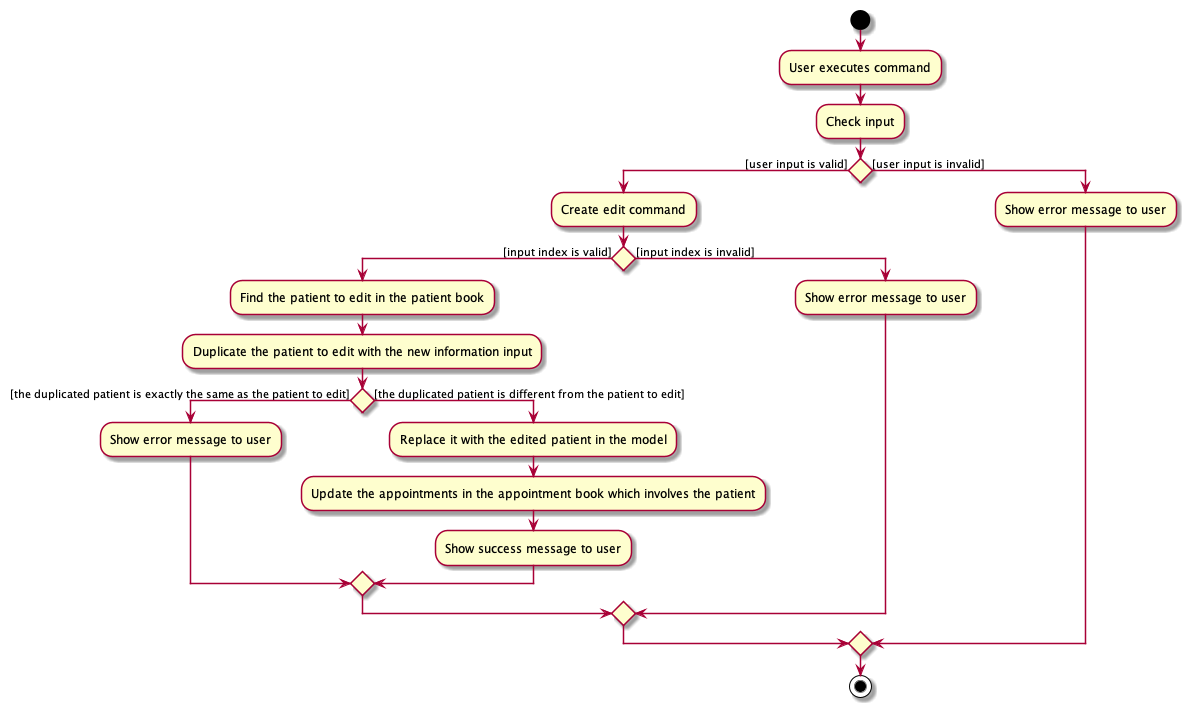
Diagram 4.1.2: Activity diagram showcasing the Edit Command execution flow
4.2 Design Considerations
Aspect: How the edit command executes
-
Alternative 1 (current choice): Separate parsing from code execution
- Pros: Separate the responsibilities clearly between classes and adhere to the Single Responsibility Principle.
- Cons: Increases numbers of lines of code and may increase coupling as objects are passed around between the classes.
-
Alternative 2: Parse and Execute in the same class
- Pros: Fewer lines of code, less fields/objects are passed between classes which reduces the coupling.
- Cons: No separation between classes violates the Single Responsibility Principle. Compromises the readability of the code and increases the difficulty of debugging and maintaining the code base.
Aspect: How to update corresponding appointment instance
-
Alternative 1 (current choice): Separate updating
appointmentfrom editingpatient- Pros: Draws clear distinction between the responsibilities of
appointmentBookandpatientBook. Reduces the coupling. - Cons: Increases numbers of lines of code and increases the cost of testing since more tests have to be carried out.
- Pros: Draws clear distinction between the responsibilities of
-
Alternative 2: Update
appointmenttogether witheditpatient in one function- Pros: Fewer lines of code. Lower cost of testing.
- Cons: No separation between classes violates the Single Responsibility Principle. Compromises the readability of the code and increases the difficulty of debugging and maintaining the code base. Increases the coupling.
5. Remark feature
[written by: Low Ming Lim]
The remark feature allows users to add a custom note to a new or existing patient using the r/ tag in multiple commands.
This provides our users with the flexibility and freedom to store extra notes or bio data for a patient apart from the compulsory
fields such as name, phone number, etc.
5.1 Implementation
This feature creates a Remark instance which is stored internally in Nuudle as a variable of a Patient object
which is in turn stored in the PatientBook. These classes are a part of the Model component and are illustrated
in the class diagram below.
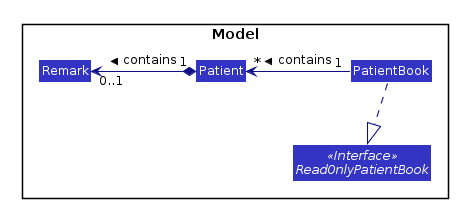
Diagram 5.1.1: Class diagram for classes involved in the remark feature of the Model component
Additionally, to facilitate greater convenience for our users, we have implemented our remark feature to support the following pathways:
-
Adding a remark via the
AddCommandfor a newPatient:Command syntax:
add n/NAME i/NRIC p/PHONE_NUMBER a/ADDRESS [r/REMARK] [t/TAG]…Example Usage:
add n/Betsy i/S9123456G t/friend a/NUS Utown p/1234567 r/Prefers Dr Johnadd n/John Doe i/S9730284G p/98765432 a/John street, block 123, #01-01 r/Regular customer
-
Adding a remark via the
RemarkCommandfor an existingPatient:Command syntax:
remark INDEX [r/REMARK]Example Usage:
remark 2 r/Has been visiting Dr Johnremark 1 r/Can only converse in mandarin
-
Or via the
EditCommand:Command syntax:
edit INDEX [n/NAME] [i/NRIC] [p/PHONE_NUMBER] [a/ADDRESS] [r/REMARK] [t/TAG]…Example Usage:
edit 1 r/Can only converse in mandarinedit 2 n/Betsy r/Has been visiting Dr John
Refer to the following activity diagram for a summary of the above pathways.
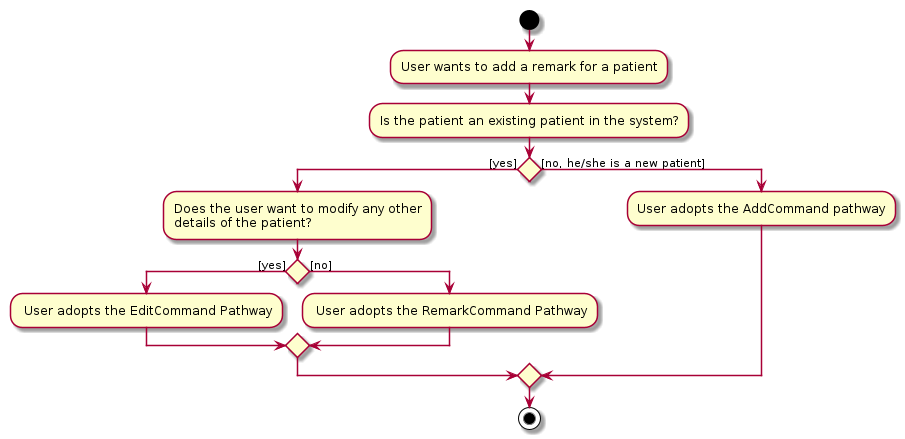
Diagram 5.1.2: Activity diagram showcasing available pathways to create a remark
This segment will focus on the implementation details for the RemarkCommand pathway. The implementation for the
alternative EditCommand pathway can be found in another segment of our Developer’s Guide while the implementation
for the AddCommand pathway is inherited from the original AB3-Addressbook.
The addition of a remark via the remark command pathway is mainly facilitated by the RemarkCommand class which
extends the abstract class Command. A RemarkCommandParser which implements the Parser interface is required
to instantiate a RemarkCommand from the user input. The classes mentioned above in this paragraph resides in our
logic component.
5.2 Implementation Illustration

Diagram 5.2.1: Sequence diagram for the Remark Command
The following is a step by step illustration of how the remark command mechanism works for an example scenario based on the sequence diagram above:
-
The user executes the
remark 1 r/Can only converse in chinesecommand to add the remarkCan only ...to the first patient in the patient list currently displayed to the user. -
This request is handled by
LogicManager#execute(String), which then calls and passes the input over to theNuudleParser#parseCommand(String)method. -
During the execution of the
NuudleParser#parseCommand(String)method,NuudleParserdetects the command wordremarkin the input string and creates a newRemarkCommandParser. -
The
RemarkCommandParser#parse(String)method is then subsequently called to parse the rest of the input string according to the format specified forRemarkCommand. Input validation for the appropriateIndexandRemarkformat is performed here by calling theParserUtil#parseIndexandParserUtil#parseRemarkmethods respectively.
The process described in step 4 is shown in the following sequence diagram:
Diagram 5.2.2: Sequence diagram for the Remark-ParserUtil interactions -
The
RemarkCommandParserthen instantiates a newRemarkCommandwith the appropriateIndexandRemarkobject. This newRemarkCommandis then returned toNuudleParserand subsequentlyLogicManagerat the end of theNuudleParser#parseCommand(String)execution. -
LogicManagerproceeds to call theRemarkCommand#execute(Model)method. -
RemarkCommandobtains a copy of theFilteredPatientListby calling theModel#getFilteredPatientList()method. -
The
patientToEditis then identified from theFilteredPatientListbased on theIndexprovided. -
A new
editedPatientis then created with the inputRemarkwhile the rest of its particulars are duplicated from thepatientToEdit. -
After all is done, the
editedPatientis set to replace thepatientToEditin theModelvia theModel#setPatient(Patient, Patient)method. -
Model#updateFilteredPatientListis then called to update theFilteredPatientListdisplayed by the UI.
The above process is shown in the following sequence diagram:
Diagram 5.2.3: Sequence diagram for the Remark-Model interactions -
Lastly, the
RemarkCommandcreates aCommandResultwith aSuccessMessageand returns it toLogicManager. -
The
SuccessMessageis then displayed to the user via the GUI.
The following activity diagram summarizes the above steps when a user uses the remark command pathway:

Diagram 5.2.4: Activity diagram showcasing the Remark Command execution flow
5.3 Design Considerations
Aspect: How the remark command executes
-
Alternative 1 (current choice): Separate parsing from code execution
-
Pros: Responsibilities of classes are clearly distinguished. Adherence to the Single Responsibility Principle helps improve code cohesion. Changes to either the parser or execution will no longer affect each other.
-
Cons: Increases the code base, may increase coupling as objects are passed around between the classes. More tests have to be written for the respective classes, thus increasing the cost of testing.
-
-
Alternative 2: Parse and Execute in the same class
-
Pros: Size of code base is reduced. Fewer objects are passed between classes thereby reducing coupling.
-
Cons: Violates the Single Responsibility Principle and reduces code readability. Harder for team members to maintain the code base. Increases code cohesion. Code design will also differ from other commands such as
AddandEditwhich are adapted from AddressBookLevel3.
-
6. Undo/redo feature
[maintained by: Yang Yue]
6.1 Implementation
The proposed undo/redo mechanism is facilitated by VersionedPatientBook and VersionedAppointmentBook. They extend PatientBook and AppointmentBook respectively with an undo/redo history, stored internally as an patientBookStateList, appointmentBookStateList and currentStatePointer. Additionally, it implements the following operations:
-
VersionedPatientBook#commit()— Saves the current patient book state in its history. -
VersionedAppointmentBook#commit()— Saves the current appointment book state in its history. -
VersionedPatientBook#undo()— Restores the previous patient book state from its history. -
VersionedAppointmentBook#undo()— Restores the previous appointment book state from its history. -
VersionedPatientBook#redo()— Restores a previously undone patient book state from its history. -
VersionedAppointmentBook#redo()— Restores a previously undone appointment book state from its history.
These operations are exposed in the Model interface as Model#commitPatientBook(), Model#commitAppointmentBook(), Model#undoPatientBook(), Model#undoAppointmentBook(), Model#redoPatientBook(), and Model#redoAppointmentBook() respectively.
Given below is an example usage scenario and how the undo/redo mechanism behaves at each step.
Step 1. The user launches the application for the first time. The VersionedPatientBook and VersionedAppointmentBook will be initialized with the initial patient book state and initial appointment book state, and the currentStatePointer pointing to that single patient book state and appointment book state.
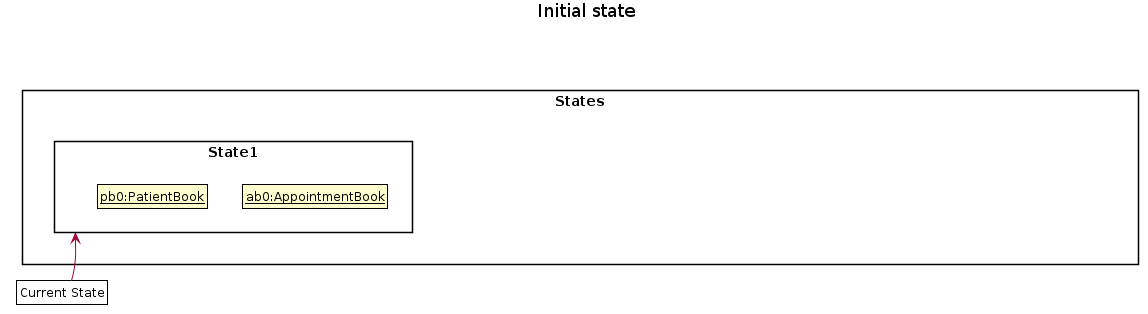
Diagram 6.1.1: Diagram showcasing the initial state
Step 2. The user executes delete 5 command to delete the 5th person in the patient book. The delete command calls Model#commitPatientBook() and Model#commitAppointmentBook(), causing the modified states after the delete 5 command executes to be saved in the patientBookStateList and appointmentBookStateList, and the currentStatePointer is shifted to the newly inserted state.
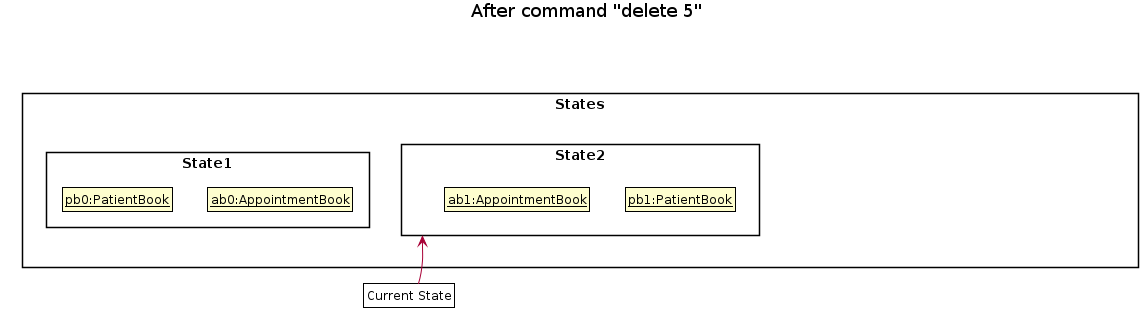
Diagram 6.1.2: Diagram showcasing the state after executing delete command
Step 3. The user executes add n/David … to add a new person. The add command also calls Model#commitPatientBook() and Model#commitAppointmentBook(), causing another modified states to be saved into the patientBookStateList and appointmentBookStateList.
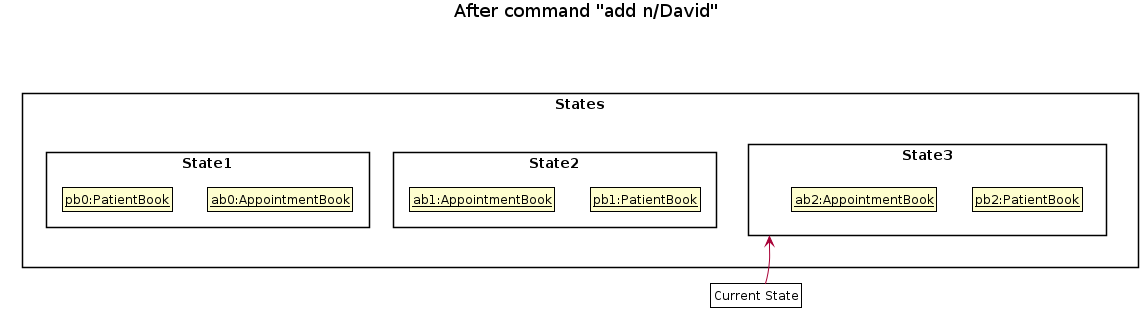
Diagram 6.1.3: Diagram showcasing the state after executing add command
Model#commitPatientBook() and Model#commitAppointmentBook(), so the two book states will not be saved into the patientBookStateList and appointmentBookStateList.
Step 4. The user now decides that adding the person was a mistake, and decides to undo that action by executing the undo command. The undo command will call Model#commitPatientBook() and Model#commitAppointmentBook(), which will shift the currentStatePointer once to the left, pointing it to the previous states, and restores the patient book and appointment book to that state.
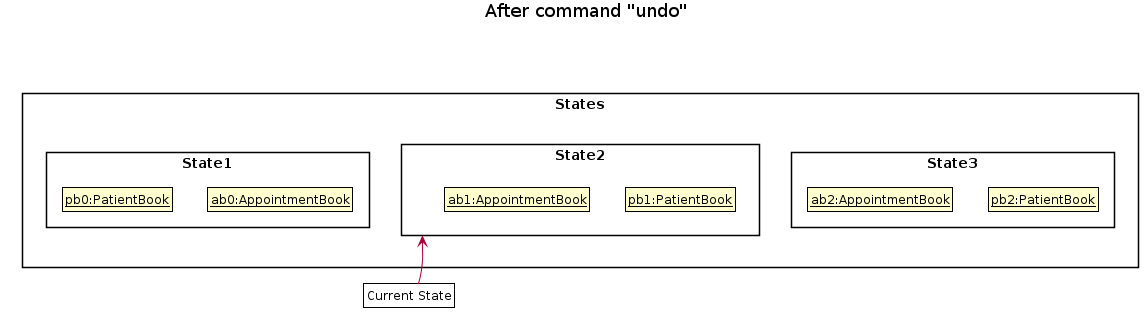
Diagram 6.1.4: Diagram showcasing the state after executing undo command
currentStatePointer is at index 0, pointing to the initial PatientBook state and initial AppointmentBook state, then there are no previous PatientBook and AppointmentBook states to restore. The undo command uses Model#canUndoPatientBook() and Model#canUndoAppointmentBook() to check if this is the case. If so, it will return an error to the user rather
than attempting to perform the undo.
The following sequence diagram shows how the undo operation works:
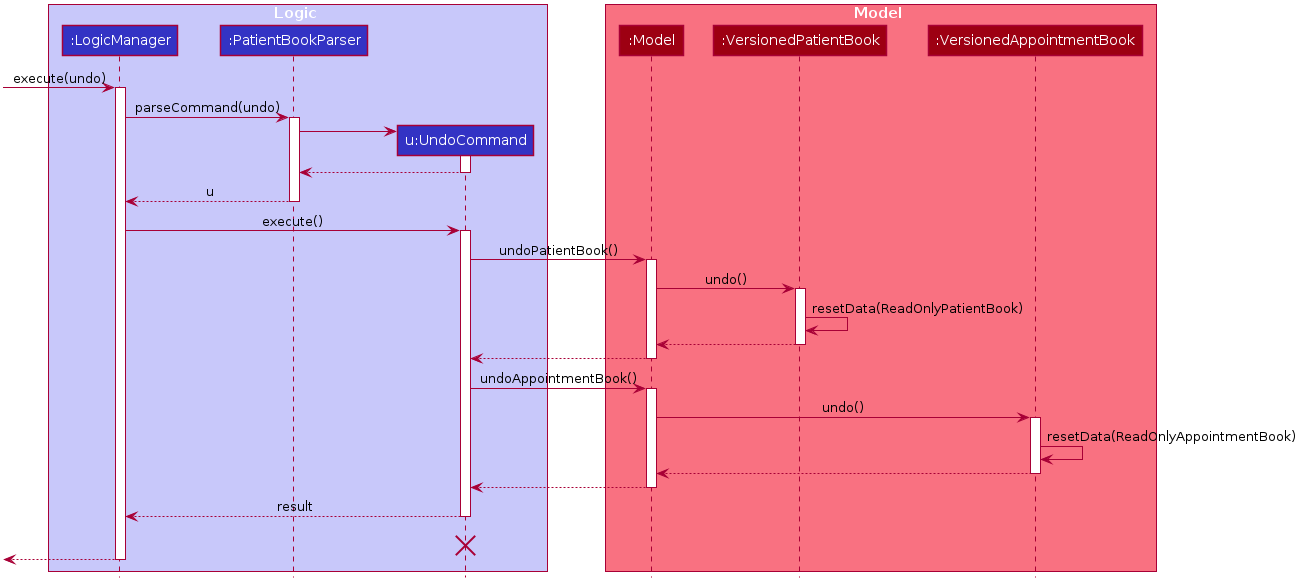
Diagram 6.1.5: Sequence diagram for undo command process
UndoCommand should end at the destroy marker (X) but due to a limitation of PlantUML, the lifeline reaches the end of diagram.
The redo command does the opposite — it calls Model#redoPatientBook() and Model#redoAppointmentBook(), which shifts the currentStatePointer once to the right, pointing to the previously undone state, and restores the patient book and appointment book to that state.
currentStatePointer is at index appointmentBookStateList.size() - 1 and patientBookStateList.size() - 1, pointing to the latest state, then there are no undone states to restore. The redo command uses Model#canRedoAppointmentBook() and Model#canRedoPatientBook() to check if this is the case. If so, it will return an error to the user rather than attempting to perform the redo.
Step 5. The user then decides to execute the command list. Commands that do not modify the patient book and appointment book, such as list, will usually not call Model#commitPatientBook(), Model#commitAppointmentBook(), Model#undoPatientBook() or Model#redoPatientBook(). Thus, the patientBookStateList and appointmentBookStateList remains unchanged.

Diagram 6.1.6: Diagram showcasing the state after executing list command
Step 6. The user executes clear, which calls Model#commitPatientBook() and Model#commitAppointmentBook(). Since the currentStatePointer is not pointing at the end of the patientBookStateList and appointmentBookStateList, all states after the currentStatePointer will be purged. Reason: It no longer makes sense to redo the add n/David … command. This is the behavior that most modern desktop applications follow.
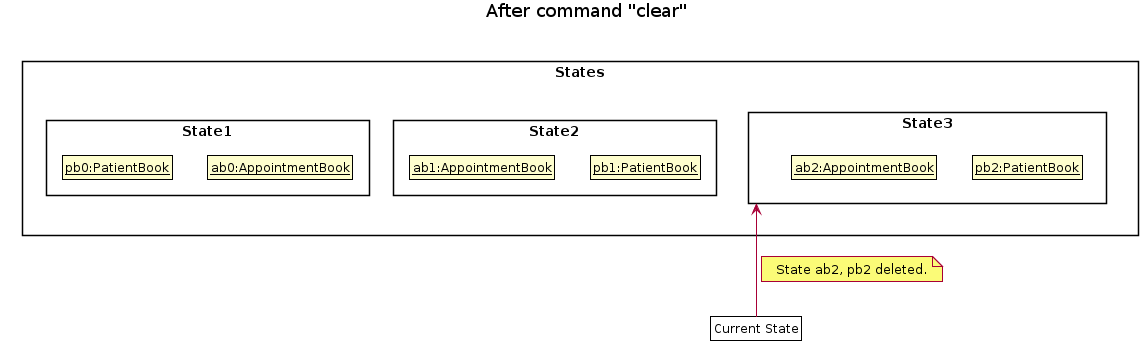
Diagram 6.1.7: Diagram showcasing the state after executing clear command
The following activity diagram summarizes what happens when a user executes a new command:
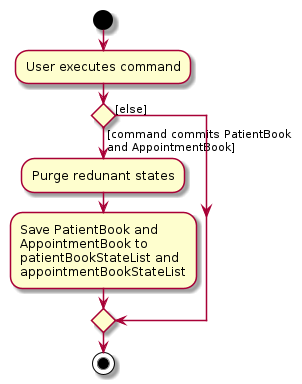
Diagram 6.1.8: Activity diagram showcasing the work flow of executing a new command
6.2 Design consideration:
Aspect: How undo & redo executes
-
Alternative 1 (current choice): Saves the entire appointment book and patient book.
- Pros: Easy to implement.
- Cons: May have performance issues in terms of memory usage.
-
Alternative 2: Individual command knows how to undo/redo by
itself.
- Pros: Will use less memory (e.g. for
delete, just save the person being deleted). - Cons: We must ensure that the implementation of each individual command are correct.
- Pros: Will use less memory (e.g. for
7. Find Available Time Slots
[written by: Xin Zhe]
The Find Available Time Slots Feature allows the nurse to obtain the available time slots on a specified date along with the earliest available slot.
7.1 Implementation
Finding available time slots is facilitated by the AvailableCommand, which extends the abstract class Command,
and the AvailableCommandParser, which implements the Parser interface. All of these classes are part of the Logic component.
This feature is supported by the UniqueAppointmentList which stores the Appointment instances, the ScheduleManager which handles the scheduling-related operations, and TimeIntervalList which stores the TimeInterval instances. These classes are part of the model component.
Given below is an example usage scenario and how the edit mechanism behaves at each step.
1: The user types avail d/12-Apr-2021 into Nuudle.
2: The request is handled by LogicManager#execute(String), which then calls and passes the input to the NuudleParser#parseCommand(String) method.
3: NuudleParser detects the command word avail in the input string and creates a new AvailableCommandParser to parse inputs according to the format specified for AvailableCommand.
4: Input is parsed using the AvailableCommandParser#parse(String) method, which also performs input validation and checks whether the input date is today. A DateMatchesPredicate instance is created based on the parsed date.
5: The AvailableCommandParser creates a new AvailableCommand instance with boolean value isToday and newly created DateMatchesPredicate object and returns it to NuudleParser, which in turn returns it to LogicManager.
6: LogicManager calls the AvailableCommand#execute(Model) method.
7: AvailableCommand updates the filtered list by calling Model#updateFilteredAppointmentList(Predicate) method.
8: AvailableCommand obtains a copy of the FilteredAppointmentList by calling the Model#getFilteredAppointmentList() method.
9: AvailableCommand creates a timeSlotsMessage by calling the Model#findAvailableTimeSlots(List<Appointment>, Boolean) method.
10: Lastly, AvailableCommand creates a CommandResult with SuccessMessage and timeSlotsMessage and returns it to LogicManager.
The above process is shown in the following sequence diagram:
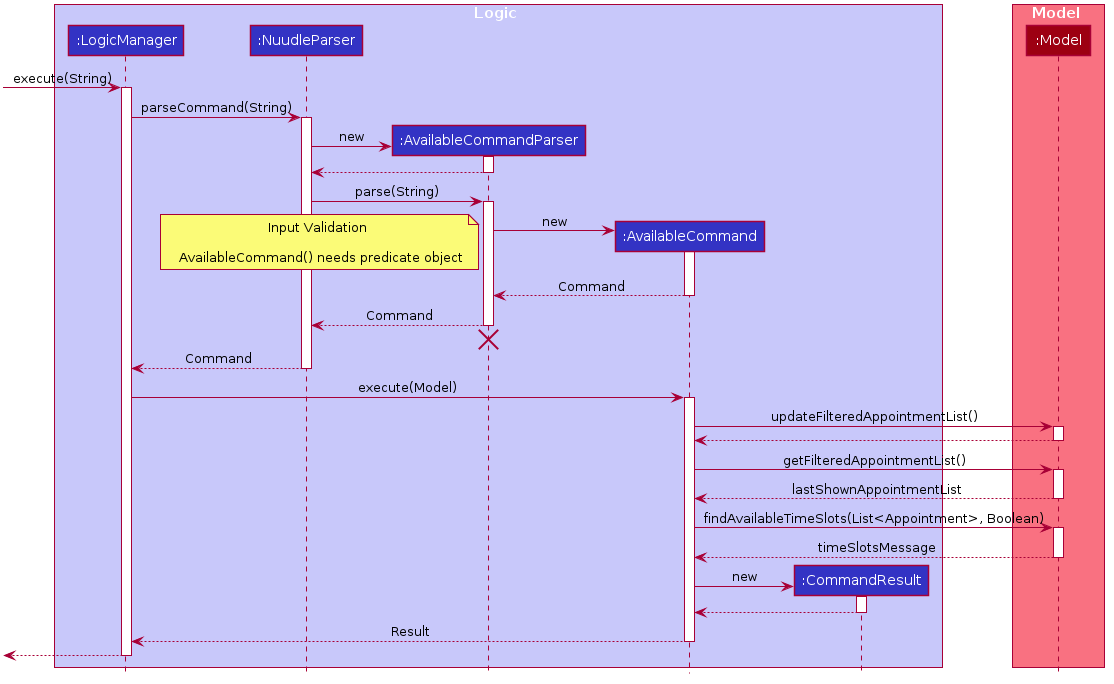
Diagram 7.1.1: Sequence diagram showcasing the Available Command process
The following activity diagram summarises the general workflow for the Available Command:
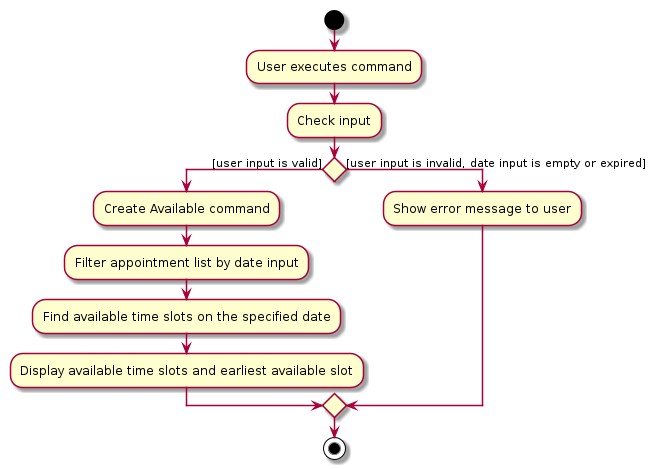
Diagram 7.1.2: Activity diagram showcasing the Available Command execution flow
7.2 Design Considerations
Aspect: How the avail command executes
-
Alternative 1 (current choice): Separate parsing from code execution
- Pros: Separate the responsibilities clearly between classes and adhere to the Single Responsibility Principle.
- Cons: Increases numbers of lines of code and may increase coupling as objects are passed around between the classes.
-
Alternative 2: Parse and Execute in the same class
- Pros: Fewer lines of code, less fields/objects are passed between classes which reduces the coupling.
- Cons: No separation between classes violates the Single Responsibility Principle. Compromises the readability of the code and increases the difficulty of debugging and maintaining the code base.
Aspect: How to obtain available timeInterval instance
-
Alternative 1 (current choice): Create
TimeIntervalandTimeIntervalListmodels to represent the time slots and createscheduleManagermodel to handle operations related toTimeInterval- Pros: Draws clear distinction between the responsibilities of
appointmentBookandscheduleManager. Reduces the coupling and adheres to the Single Responsibility Principle by creating multiple scheduling related models. - Cons: Increases numbers of lines of code and increases the cost of testing since more tests have to be carried out.
- Pros: Draws clear distinction between the responsibilities of
-
Alternative 2: Let
UniqueAppointmentListhandle the creation and filtering of available time slots- Pros: Fewer lines of code. Lower cost of testing.
- Cons: No separation between classes violates the Single Responsibility Principle. Compromises the readability of the code and
increases the difficulty of debugging and maintaining the code base. Increases the coupling.
UniqueAppointmentListwill handle objects from different classes and complicated operations which are not under its obligations.
Documentation, logging, testing, configuration, dev-ops
Appendix: Requirements
Product scope
Target user profile story:
Namise is a hard working nurse working at a popular dental clinic situated in town and gets appointment calls on an hourly basis. Swarmed with incoming calls, Namise has to make new appointments for new and existing patients while keeping track of the doctor’s schedule at the same time 😞. With the need to juggle multiple tasks at once, Namise is also prone to making careless mistakes in his work due to fatigue.
Being a tech-savvy nurse armed with a commendable experience in unix, Namise prefers to scribble down appointment schedules on paper while on call with his patients to maximise efficiency. This task is further exacerbated with the need to transfer these notes into an excel table manually later in the day.
Target user profile summary:
- Nurse working in a highly popular, small scale dental clinic
- Responsible for scheduling a large number of appointments daily
- Add new patients to the clinic records
- Do not entertain walk-ins and only operate on an appointment-basis
- Required to multi-task (create appointment arrangements with patients over the phone)
- Prone to carelessness due to the sheer number of appointments to handle
- Tech-savvy
- Prefers typing & wants to get things done quickly
- Tired of transferring appointment details from paper notes to excel
- Prefers desktop apps over other types
- Types fast
- Prefers typing to mouse interactions
- Reasonably comfortable using CLI apps
Value proposition:
Help nurses handle and schedule dental appointments for patients faster than a typical mouse/GUI driven app or excel scheduling
User stories
Priorities: High (must have) - * * *, Medium (nice to have) - * *, Low (unlikely to have) - *
| Priority | As a … | I want to … | So that I can… |
|---|---|---|---|
* * |
new user | see an overview of the commands that are available to me | familiarise myself with using the app command |
* * * |
nurse | view the entire patient list | assign them to their appointments |
* * * |
administrative nurse | add new patient into the system | assign an appointment to them |
* * * |
administrative nurse | delete the patient information | manage the patient list easily when it is needed |
* * * |
administrative nurse | search for patient by IC | locate a patient easily |
* * * |
nurse | create patient appointment | assign patient to a time slot for their appointment |
* * * |
nurse | delete an appointment | cancel an appointment |
* * * |
nurse | view the entire appointment list for the certain day | update my dentists of the itinerary for the day |
* * * |
nurse | mark the appointment as complete if the patient completes his/her appointment | have an accurate representation of the remaining appointments |
* * |
nurse | add diagnosis to a completed appointment | have a record of the patient’s visit |
* * |
administrative nurse | search for patient by phone number | locate a patient easily |
* * |
administrative nurse | search for patient by name | locate a patient easily |
* * |
administrative nurse | change the patient’s appointment if they call to postpone their appointment | update the appointment easily |
* * |
administrative nurse | edit patient’s details | keep the information of patients up-to-date |
* * |
nurse | get the available time slots for a day | inform my patient of the available times for that day |
* |
nurse | get the next available time slot | inform my patient of the next available timing should their original preferred choice be filled |
* * |
nurse handling multiple appointments | archive records of past appointments | review them in the future |
* |
nurse | record the patient’s existing medical condition | confirm if the medicine prescribed are suitable |
* |
nurse | check the patient’s drug allergy | confirm if the medicines prescribed are not in the list |
* |
nurse | get the number of appointments for the day | know how many appointments to expect today |
* |
nurse | get the number of appointments for the week | know how busy the clinic is for the week |
Use cases
(For all use cases below, the System is the Nuudle and the Actor is the user, unless specified otherwise)
Use case: UC01 - Add a patient
MSS
- User requests to add a patient to the list.
- Nuudle adds the patient.
Extensions
-
1a. The given keywords are invalid.
-
1a1. Nuudle shows an error message.
Use case ends.
-
Use case: UC02 - Delete a patient
MSS
- User requests to list patients.
- Nuudle shows a list of patients.
- User requests to delete a specific patient in the list.
-
Nuudle deletes the patient.
Use case ends.
Extensions
-
1a. The given keywords are invalid.
-
1a1. Nuudle shows an error message.
Use case ends.
-
-
2a. The list is empty.
Use case ends.
-
3a. The given index is invalid.
-
3a1. Nuudle shows an error message.
Use case resumes at step 2.
-
Use case: UC03 - Edit a patient
MSS
- User requests to find a specific patient.
- Nuudle shows the list of patients with the given name.
- User requests to edit the patient information.
-
Nuudle changes the patient information.
Use case ends.
Extensions
-
1a. The given keywords are invalid.
-
1a1. Nuudle shows an error message.
Use case ends.
-
-
3a. The given information for editing is invalid (including empty input).
-
3a1. Nuudle shows an error message.
Use case resumes at step 2.
-
Use case: UC04 - View patient record
MSS
- User requests to find a patient by name.
- Nuudle shows the list of patients with the requested name.
- User request to view patient record of a specific patient in the list.
-
Nuudle shows the list of records for that patient.
Use case ends.
Extensions
-
1a. The given keywords are invalid.
-
1a1. Nuudle shows an error message.
Use case ends.
-
-
2a. The list is empty.
Use case ends.
Use case: UC05 - Add an appointment
MSS
- User requests to find an available time slot.
- Nuudle shows the available time slots.
- User requests to add an appointment to a specific time slot.
-
Nuudle adds the appointment to the list of appointment records.
Use case ends.
Extensions
-
1a. The given keywords are invalid.
-
1a1. Nuudle shows an error message.
Use case ends.
-
-
3a. The given time slot is invalid (including empty input).
-
3a1. Nuudle shows an error message.
Use case resumes at step 2.
-
Use case: UC06 - Delete an appointment
MSS
- User requests to list appointments.
- Nuudle shows the list of appointments.
- User requests to delete a specific appointment in the list.
-
Nuudle deletes the appointment.
Use case ends.
Extensions
-
1a. The given index is invalid.
-
1a1. Nuudle shows an error message.
Use case ends.
-
-
2a. The list is empty.
Use case ends.
Use case: UC07 - Change an appointment
MSS
- User requests to list all appointments.
- Nuudle shows a list of appointments.
- User requests to find an available time slot.
- Nuudle shows the available time slots.
- User requests to change a specific appointment to another time.
-
Nuudle changes the appointment.
Use case ends.
Extensions
-
1a. The given keywords are invalid.
-
1a1. Nuudle shows an error message.
Use case ends.
-
-
2a. User has no current appointments.
-
2a1. Nuudle shows an error message.
Use case ends.
-
-
5a. The given time slot is invalid (including empty input).
-
5a1. Nuudle shows an error message.
Use case resumes at step 4.
-
-
5b. The given keywords are invalid.
-
5b1. Nuudle shows an error message.
Use case ends.
-
Use case: UC08 - Mark an appointment as complete
MSS
- User requests to list appointments.
- Nuudle shows the list of appointments.
- User requests to mark an appointment as done.
-
Nuudle marks the appointment as done.
Use case ends.
Extensions
-
3a. The given index is invalid.
-
3a1. Nuudle shows an error message.
Use case resumes at step 2.
-
Use case: UC09 - View appointments for today
MSS
- User requests for the appointments scheduled for today.
-
Nuudle shows a list of appointments scheduled for today.
Use case ends.
Extensions
-
1a. The given keywords are invalid.
-
1a1. Nuudle shows an error message.
Use case ends.
-
-
1b. The given date is invalid.
-
1b1. Nuudle shows an error message.
Use case ends.
-
-
2a. The list is empty.
Use case ends.
Use case: UC10 - Create an appointment for a new patient
MSS
- User requests to create a new patient (UC01).
- Nuudle creates the new patient.
- User requests for an available time slot on a preferred day.
- Nuudle shows the available time slots.
- User requests to add an appointment for the new patient.
-
Nuudle creates the appointment.
Use case ends.
Extensions
-
3a. The given date is invalid.
-
3a1. Nuudle shows an error message.
Use case resumes at step 2.
-
-
4a. No more time slot is available for that day.
-
4a1. Nuudle shows the next available time slot on the nearest day.
-
4a1a. User uses the suggested time slot.
Use case resumes at step 5.
-
4a1b. User does not use the suggested time slot.
Use case resumes at step 3.
-
-
Non-Functional Requirements
- Should work on any mainstream OS as long as it has Java
11or above installed. - Should be able to hold up to 500 patients without a noticeable sluggishness in performance for typical usage.
- Should be able to hold up to 1000 upcoming appointments without a noticeable sluggishness in performance for typical usage.
- A user with above average typing speed for regular English text (i.e. not code, not system admin commands) should be able to accomplish most of the tasks faster using commands than using the mouse.
Glossary
- Mainstream OS: Windows, Linux, Unix, OS-X
- CSV file: A file that stores data in Comma-Separated Values format (Using commas to separate values). It can be opened using Microsoft Excel.
- JSON file: A file that stores object data in JavaScript object notation format
Appendix: Instructions for manual testing
Given below are instructions to test the app manually.
Launch and shutdown
-
Initial launch
-
Download the jar file and copy into an empty folder
-
Double-click the jar file Expected: Shows the GUI with a set of sample patients and appointments. The window size may not be optimum.
-
-
Saving window preferences
-
Resize the window to an optimum size. Adjust the main split window to preferred position. Move the window to a different location. Close the window.
-
Re-launch the app by double-clicking the jar file.
Expected: The most recent window size, split window position and location is retained.
-
Deleting a patient
-
Deleting a patient while all patients are being shown
-
Prerequisites: List all patients using the
listcommand. Multiple patients in the list. -
Test case:
delete 1
Expected: First patient is deleted from the list. Details of the deleted patient shown in the status message. -
Test case:
delete 0
Expected: No patient is deleted. Error details shown in the status message. -
Other incorrect delete commands to try:
delete,delete x,...(where x is larger than the list size)
Expected: Similar to previous.
-
Creating an appointment
-
Checking the appointment status after an appointment creation
-
Prerequisites: List all patients using the
listcommand. At least one patient in the list. No appointments for today. -
Create an appointment by using the
assign 1 d/today t/FUTURE_TIME, whereFUTURE_TIMEis a time that is in the near future but still lies within the operating hours. Expected: An appointment is created for the first patient with the indicated details. The status is shown asUpcoming. -
With the Nuudle app still running, go to your system settings and look for the
Date & Timesettings. -
Manually change the System Time to a time that lies within the appointment timeslot of the previously created appointment. You may have to temporarily turn off the
Set time automaticallyfeatures of your system.
Expected: The appointment status changes fromUpcomingtoOngoing. It may take up to 30s for Nuudle to auto update. Alternatively, you can use thelistcommand or click on the `appointment card to initiate a manual refresh. -
Now change the System Time to a time that is after the appointment timeslot of the previously created appointment.
Expected: The appointment status changes fromOngoingtoExpired. -
Mark the previously created appointment as done, using the
done 1command. Expected: The appointment’s status changed fromOngoingtoDone.
-
Loading save data on launch
-
Dealing with missing/corrupted data files
-
Prerequisites: Data save location not modified. The
preference.jsonfile is not edited. Multiple patients in the list. -
Look for the patient JSON file at the default location:
.\data\patientbook.json -
Remove the
Nricfield of the first patient in the file. Note the patient name. -
Launch the app by double-clicking the jar file.
The app safely launches with multiple patients. The patient with missing Nric field is not in the list.
-
Archiving data
-
Archiving past appointments
-
Prerequisites: Have at least one upcoming appointments and no expired appointments.
-
Locate the appointment JSON file at the default location:
.\data\appointmentbook.json -
Change the
Datefield of an appointment to a past date, with monthmayand year2019Note the details of the appointment. -
Launch the app by double-clicking the jar file.
The app safely launches. The previously edited appointment is not in the appointment list. The Command Result display indicates that 1 appointment is archived. -
Locate the appointment CSV archive file at
.\data\archives\2019_MAY.csv. The previously edited appointment should be reflected as an archived appointment.
-